Our Solis system, comprising solar panels and battery, was installed in June 2023, so we’ve now had a full year’s usage. That makes it worth checking on the experience: what was it like using the system, and how much electricity did it generate?
On the good side: the system reached the “fit and forget” stage reasonably rapidly. There was a certain amount of flailing around required to understand the electrity tariffs from our supplier, Octopus Energy, both for import (we’re buying electricity from the grid) and export (we’re selling excess electricity to the grid), followed by some experimentation to see what was likely to work best. But given that I started from a position of total ignorance, I don’t think the amount of hassle was unreasonable.
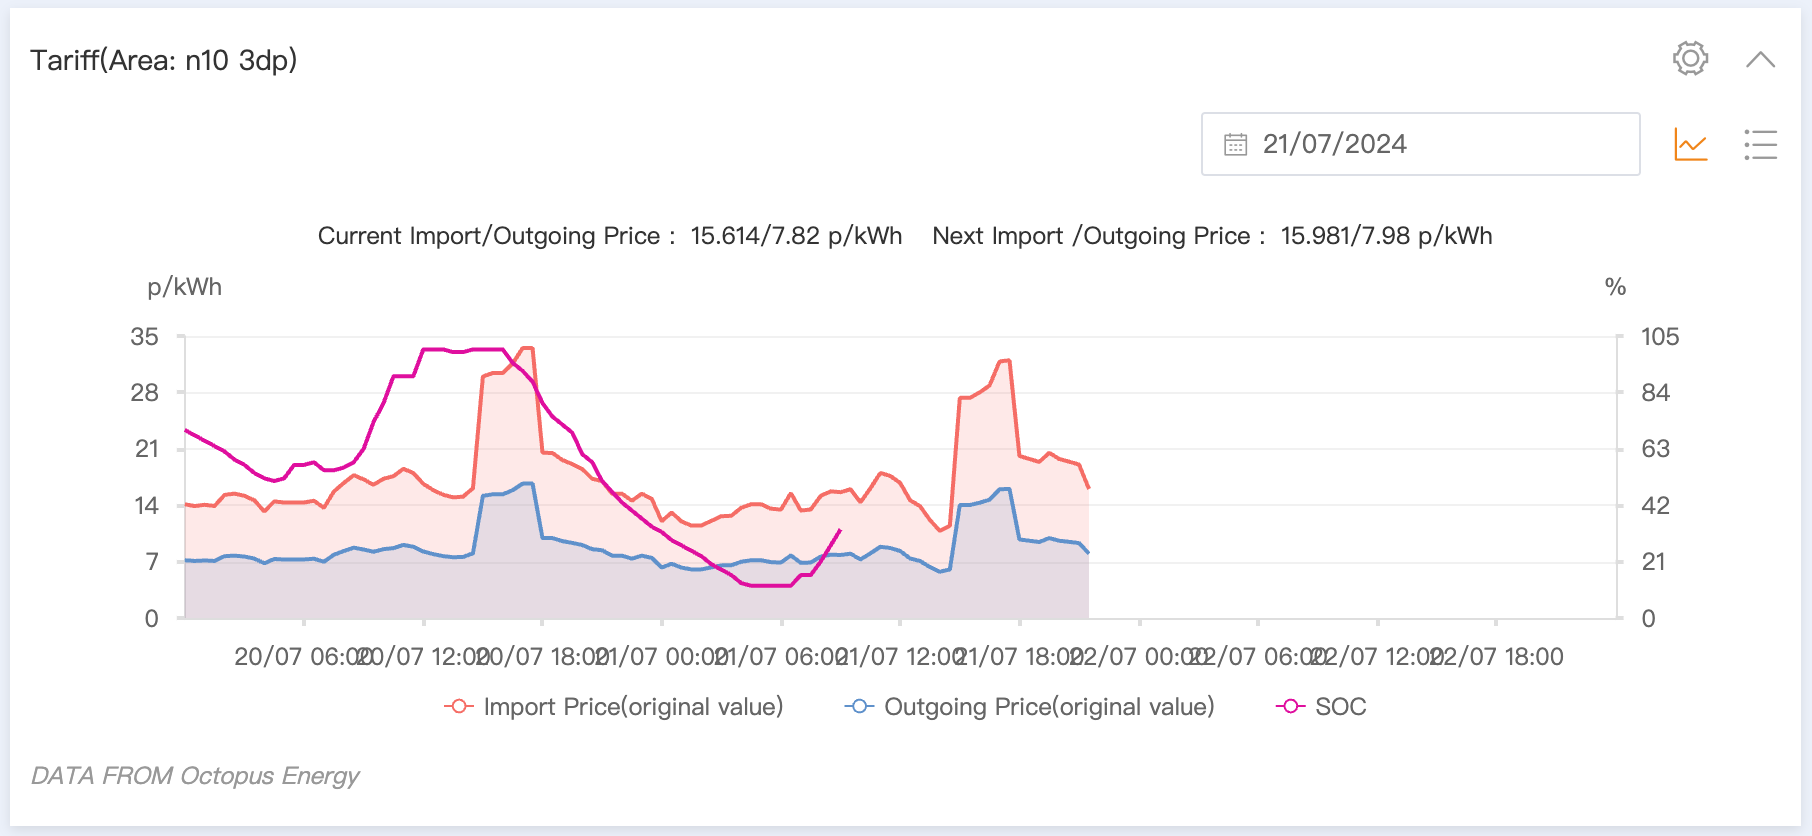
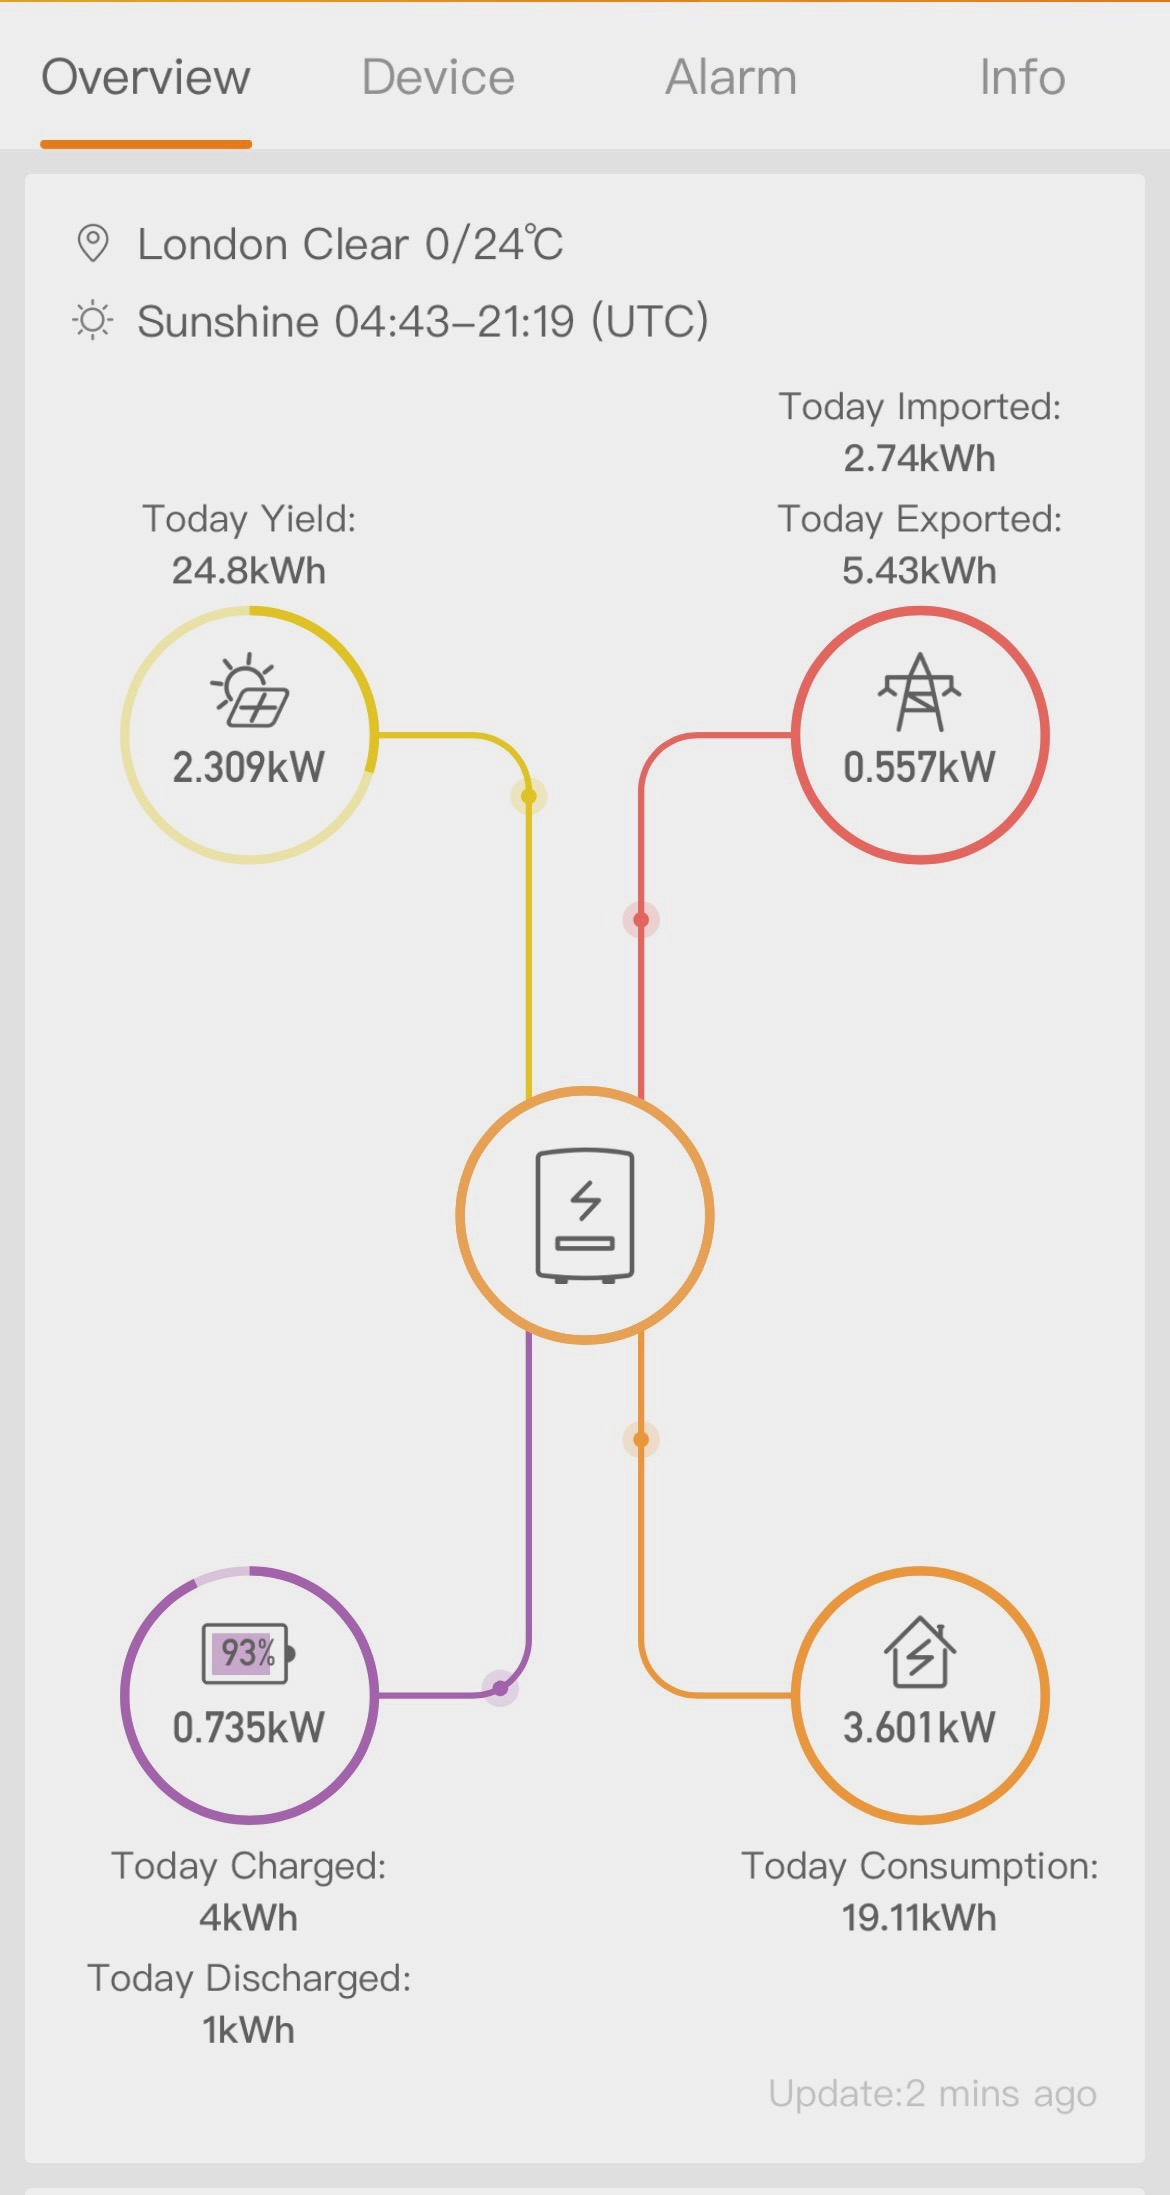
I’ve ended up settling on a plan called “Agile Octopus” for import, which varies the price considerably according to the time of day. The system seems quite good at avoiding importing energy in peak times, which means that the agile plan gives a reasonable import price: I’ve been paying around £0.165 / kWh (including 5% VAT). Since the import price varies between £0.156 and £0.31, I’d say the system is doing a good job here.
For export, however, I’ve settled on a plan called “Outgoing Octopus 12M Fixed”, which yields £0.15 per kWh: they have an agile plan, but that was yielding less revenue. The overall effect is that I’m only paying around 10% more for importing electricity than I am receiving when I export it.
In terms of how I use electricity, therefore, I’m now left with very little work. The car is set to charge at 00:30, when import tariffs are guaranteed to be around their lowest. The solar system’s 9.6 kWh battery does a good job of smoothing out everything else, so I’ve now stopped worrying about things like when’s the best time of day to put on the dishwasher, which was confusing, anyway, because it varies so much according to the seasons and according to whether the car needed charging.
The Solis system gives pretty good maxi-geeky graphs of everything it’s been doing. But to be honest, I hardly bother to look at them any more.
So much for the usability. But that leaves the elephant in the room: how much electricity are the panels generating, compared to what was expected when our installer did their estimates? Here, I’m afraid, the results are less favourable.
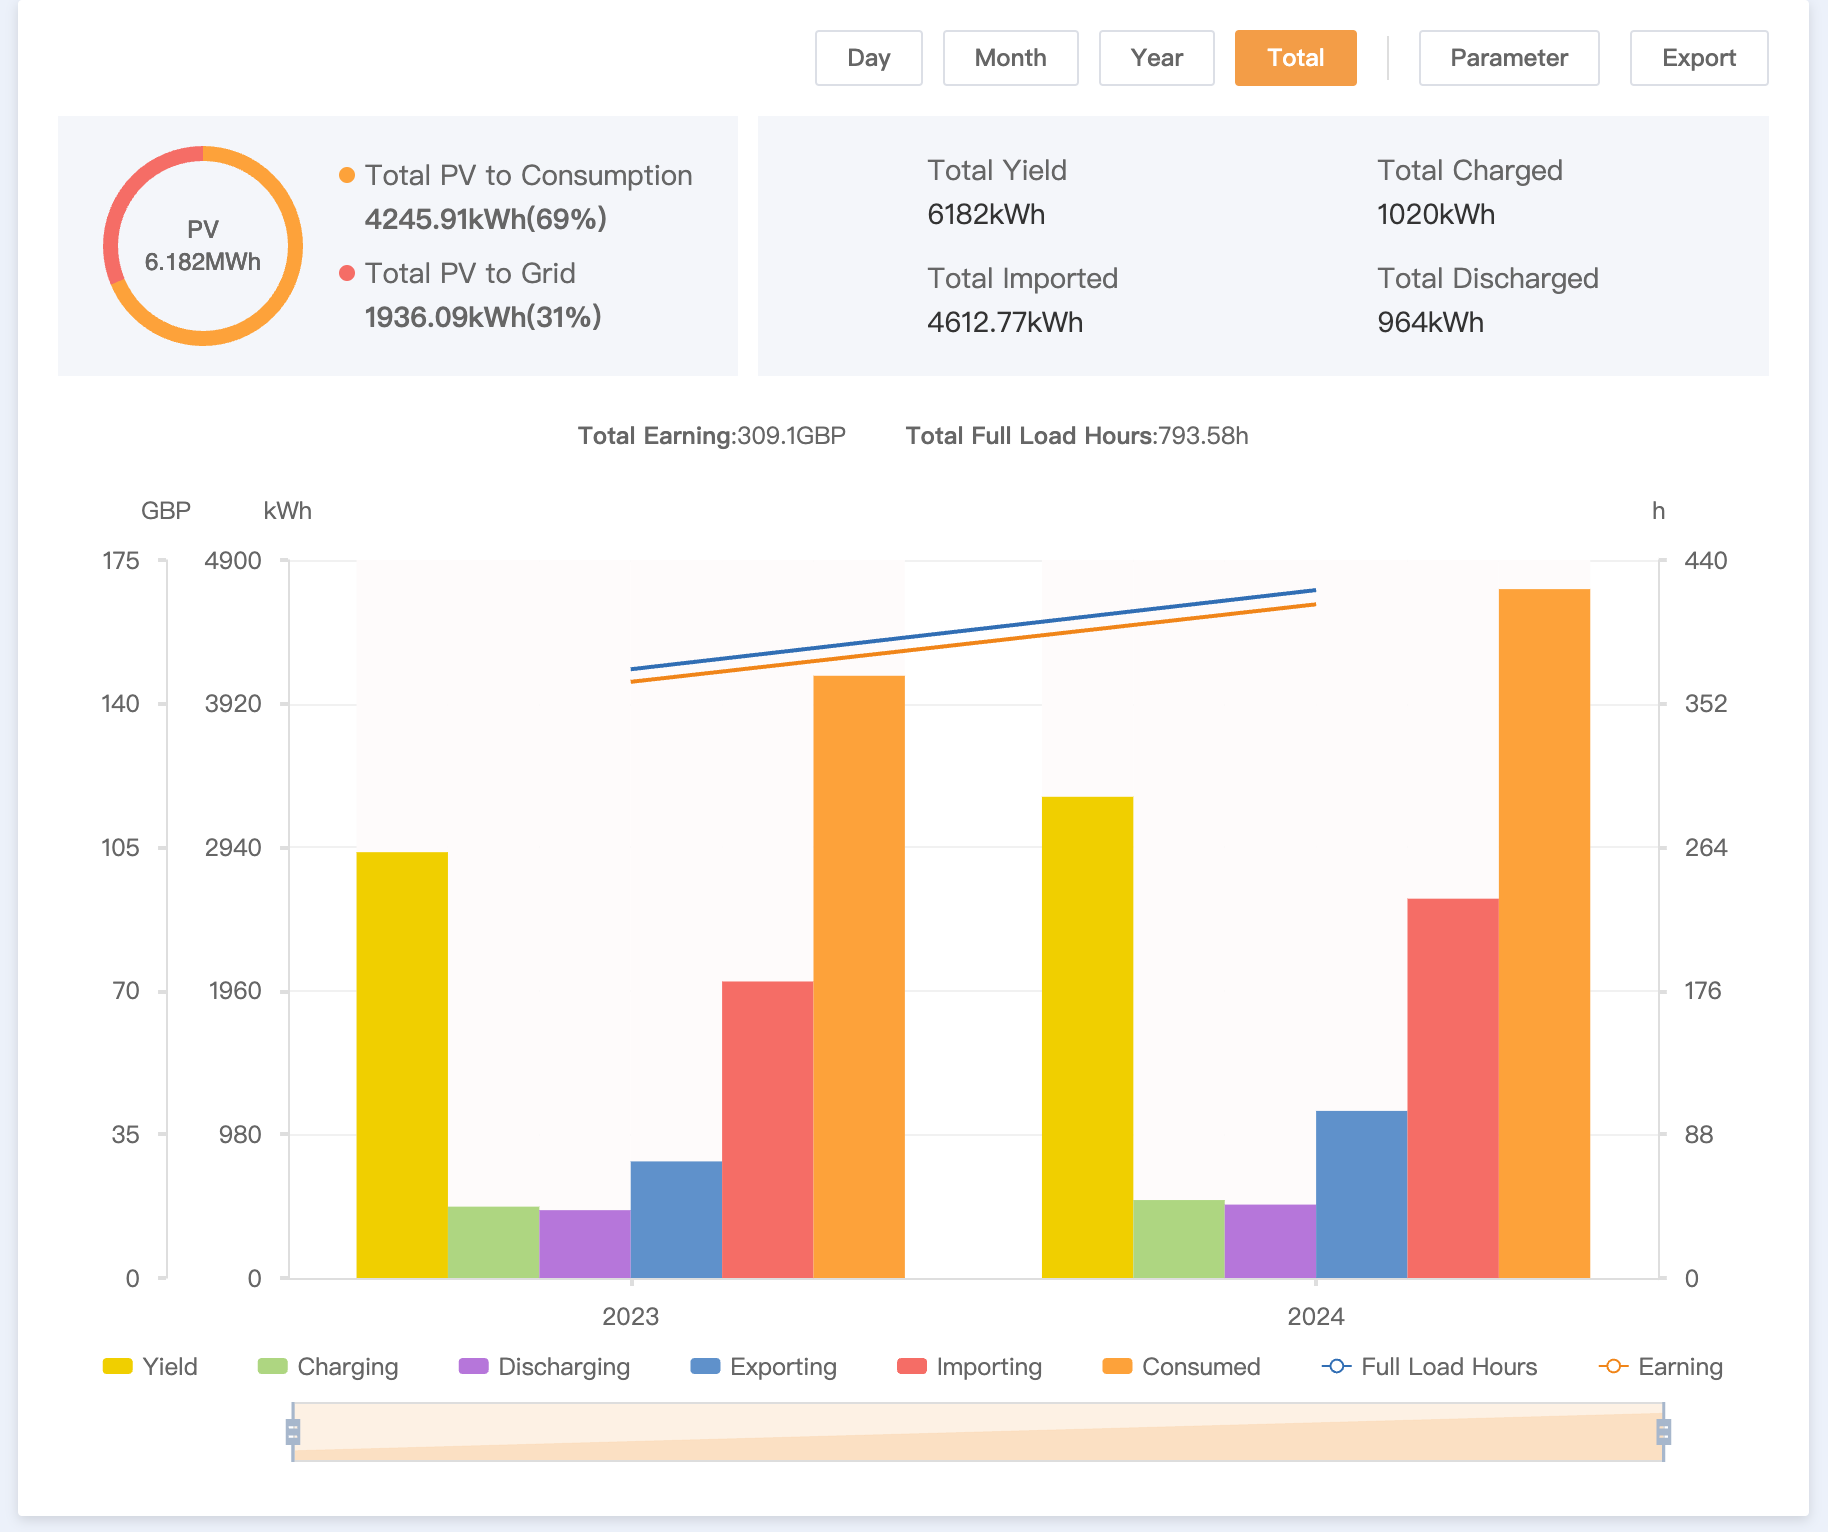
In the course of the year, the system yielded 5,259 kWh – that’s just 77% of what was predicted in our installer’s quotation. Now obviously, you expect there to be much variability according to the weather: last month, for example, the system reached its best ever yield of 885 kWh, which was 96% of the estimate. Still, I think I was hoping for closer to 85-90% than the 77% I got.
In terms of value, that was £866 knocked off my electricity bill for a system that cost £22,520 to install. The payback is going to be more like 20 years than the expected 13, bearing in mind that energy prices have come down enormously from when the system was installed.
I certainly don’t regret installing the system. It was the right thing to do my bit for the environment and I never expected giant savings. However, I won’t pretend that I’m not mildly disappointed that the numbers don’t look a bit better.
Of course, things could easily change. The weather’s been pretty poor in London over the last year, so a sunnier year could yield a lot more electricity. And sadly, there’s likely to be another spike in energy prices at some point in the system’s lifetime, in which case it will look like a sounder investment. We’ll just have to wait and see, and attempt to feel virtuous in the mean time. (Of course, I haven’t computed the carbon footprint of getting the system installed – that’s another conversation in itself).
For anyone planning a Seder night (the Jewish celebration of Passover eve), the question raises itself of how to make a flourless dessert. There are various standard tricks, like using ground almonds or matzo meal to substitute for the flour, but here is a fabulous, indulgent dessert that avoids the tricks altogether.
This chocolate mousse started life as one of my mother’s standards, taken from the classic American cookbook Joy of Cooking (still in print and being revised, 93 years after its first edition – my own copy is now so tattered that it needs replacing). I’ve made things metric and changed various quantities, mainly to suit what you buy in English supermarkets, although, to be honest, it’s incredibly forgiving: the recipe will still work OK even if you change the ratios of cream to chocolate to eggs sugar, so you can make sweeter, lighter or more intensely chocolatey at will.
Recently, I’ve been making a more substantial change: making the egg whites into an Italian meringue before folding them into the rest of the mixture. The result is a far lighter, stable consistency which, in my view, is well worth the extra effort. This needs a thermometer – if you don’t have one, just go for standard sweetened beaten egg whites.
By the way, I tend to use the egg yolks for crème pâtissière, for use in éclairs or fruit tarts.
The Italian meringue
4 large egg whites
200g sugar (this is less than most recipes, so you can up it to 300g if wanted)
5oml water
Juice of half a lemon
Pu the egg whites into the bowl of your stand mixer, equipped with the whisk attachment.
Put the sugar and water into a small saucepan and heat: for the first part of the process, make sure you mix things until the sugar is properly dissolved.
Monitor the temperature regularly with a thermometer: you will be using the syrup when it reaches 121℃.
Well in time for the syrup to be complete (I tend to start when it’s at around 90℃), whisk the egg whites until they form soft peaks. Stop the mixer.
When the syrup reaches 121℃, restart the mixer on full speed, and slowly pour the syrup into the bowl, in as thin a dribble as you can manage.
Add the lemon juice, then continue mixing for at least 10 minutes while the meringue cools.
Remove the whisk – you meringue is now ready to use.
The mousse
50g sugar
80g rum
350g dark chocolate, at least 70% cocoa solids
500ml cream
Put the sugar and rum into a saucepan and warm gently until dissolved into a syrup. You do NOT want the syrup to caramelise.
Take the syrup off the heat and leave to cool somewhat.
Break up the chocolate, then heat in a double boiler until melted
Mix in the syrup
Mix in 100ml of the cream, a bit at a time, until everything is smoothly blended
Whip the remaining 400ml of the cream until stiff
Fold in the chocolate mixture until completely blended (you don’t really want white blotches).
Now fold in the Italian meringue. Try to do it without overworking, which will lose the air – but at the same time, you want it completely mixed. It’s a good idea to fold in about a quarter of the meringue first, and then the remainder, which you’ll be able to do more gently.
Put the mousse into a large bowl for serving, or into individual ramekins or glasses if you prefer.
I like serving this with a red fruit coulis, made from reducing and sieving frozen red fruit and sugar, with a bit of lemon juice added. The sharpness of the coulis cuts through the richness of the mousse, and anyway, raspberries and chocolate are a marriage made in heaven.
The words “diabetic baker” are something of an oxymoron: diabetics really shouldn’t be eating high carbohydrate foods, which pretty much rules out bread, cakes, biscuits, pies, pastries and just about any kind of baked goods. That makes my series of blog posts on baked goods from around the world a totally inappropriate project to have done (or, viewed more positively, a rash thumbing of my nose at the health gods).
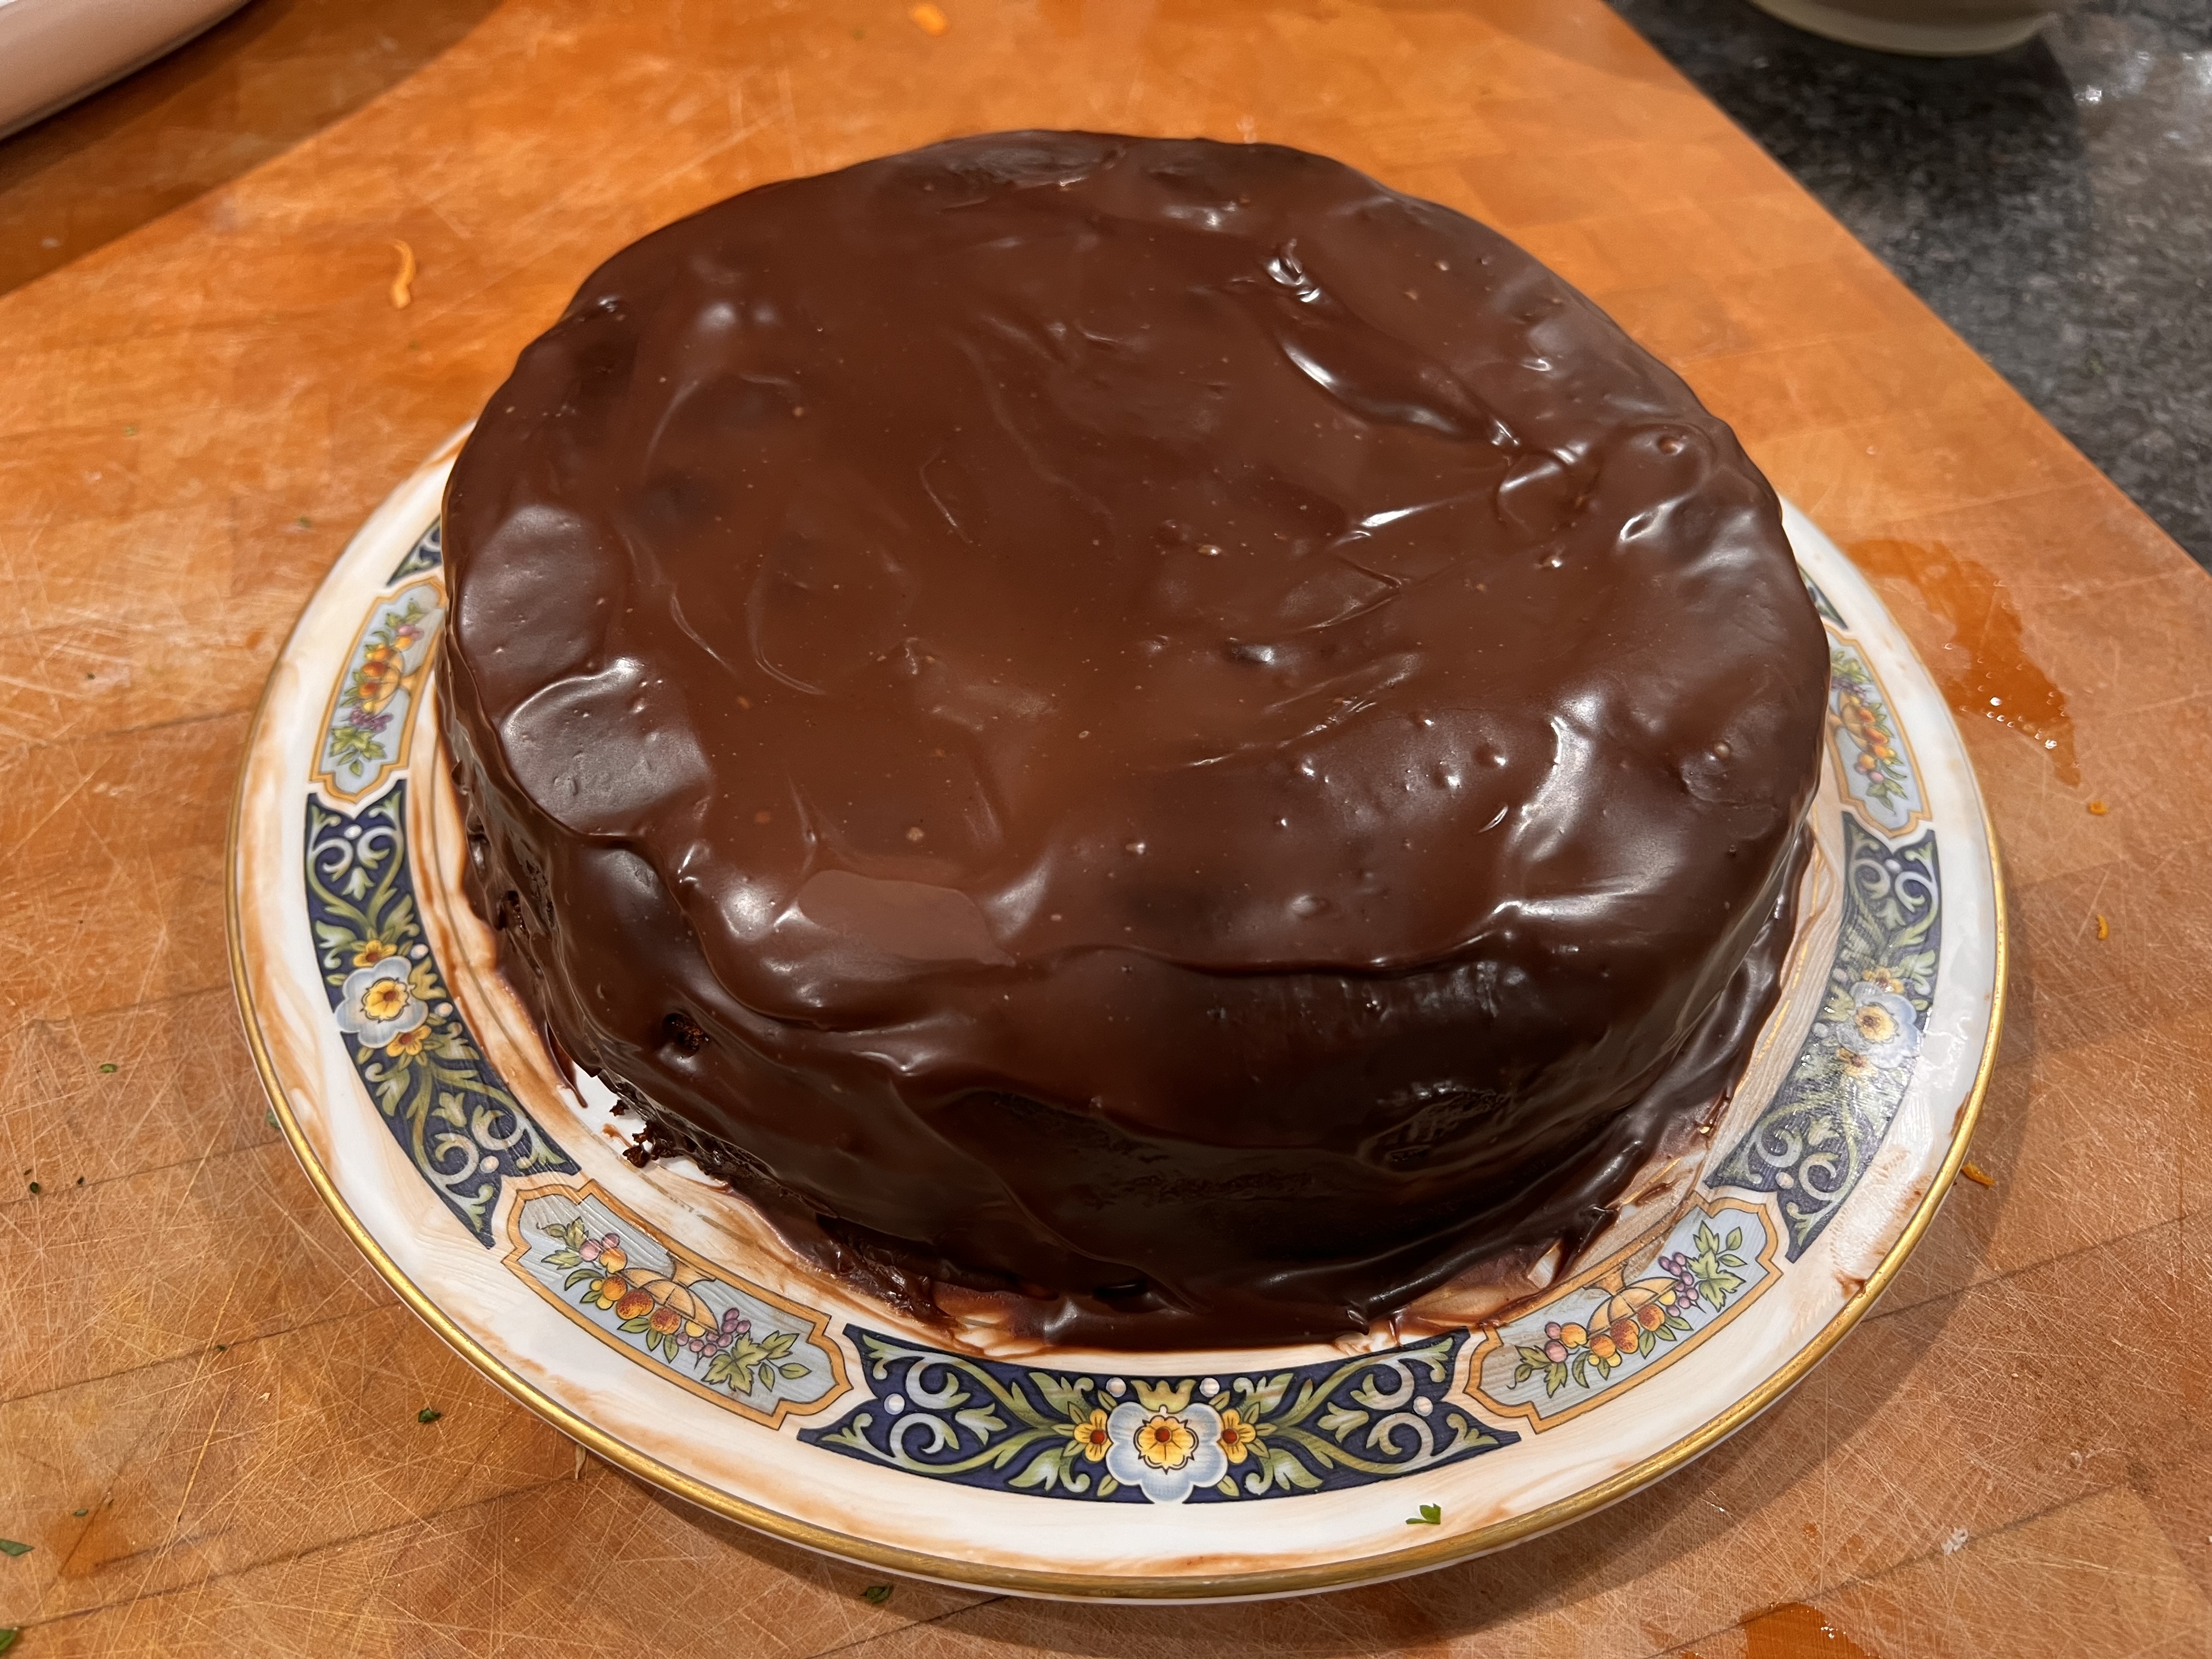
But there are times when you can cheat. I just ran an experiment to see how far I could minimise the carbohydrate content of my favourite cake – Sachertorte – and it was outstandingly successful.
Starting with my recipe for normal Sachertorte, I did four things:
Replace the flour with ground almonds
Replace the sugar with allulose
Replace the icing with a chocolate ganache
Keep careful control of the amount of apricot jam in the filling
With more time available and apricots in season, I could have made my own apricot compote with allulose, but there really wasn’t time.
If you aren’t aware of allulose (aka Psicose or D-ribo-2-hexulose): it’s a naturally occurring sugar which you can’t digest normally. It tastes something like 70% as sweet as sugar. I find that it has little or none of the aftertaste of most non-sugar sweeteners – and in a recipe with this one, with its strong-tasting dark chocolate, I could detect no aftertaste whatsoever. People have questioned whether there any health risks, but the US FDA have approved it with a maximum consumption of 33-36g per day for a 60kg adult (a portion of this cake uses under 20g, so I reckon it looks OK).
Comparing the two recipes, the carbohydrate budget looks like this. In rough numbers, the new recipe’s carbohydrate count is a quarter of the standard one.
Normal
Diabetic
Saving
Dark chocolate 300g
90g
90g
–
Sugar to allulose
150g
0
150g
Flour to ground almonds
76g
19g
57g
Remove icing
200g
0
200g
Apricot jam 90g to 60g
53g
35g
18g
Total for a 1kg cake
569g
144g
425g
Total for a (generous) 125g portion
71g
18g
53g
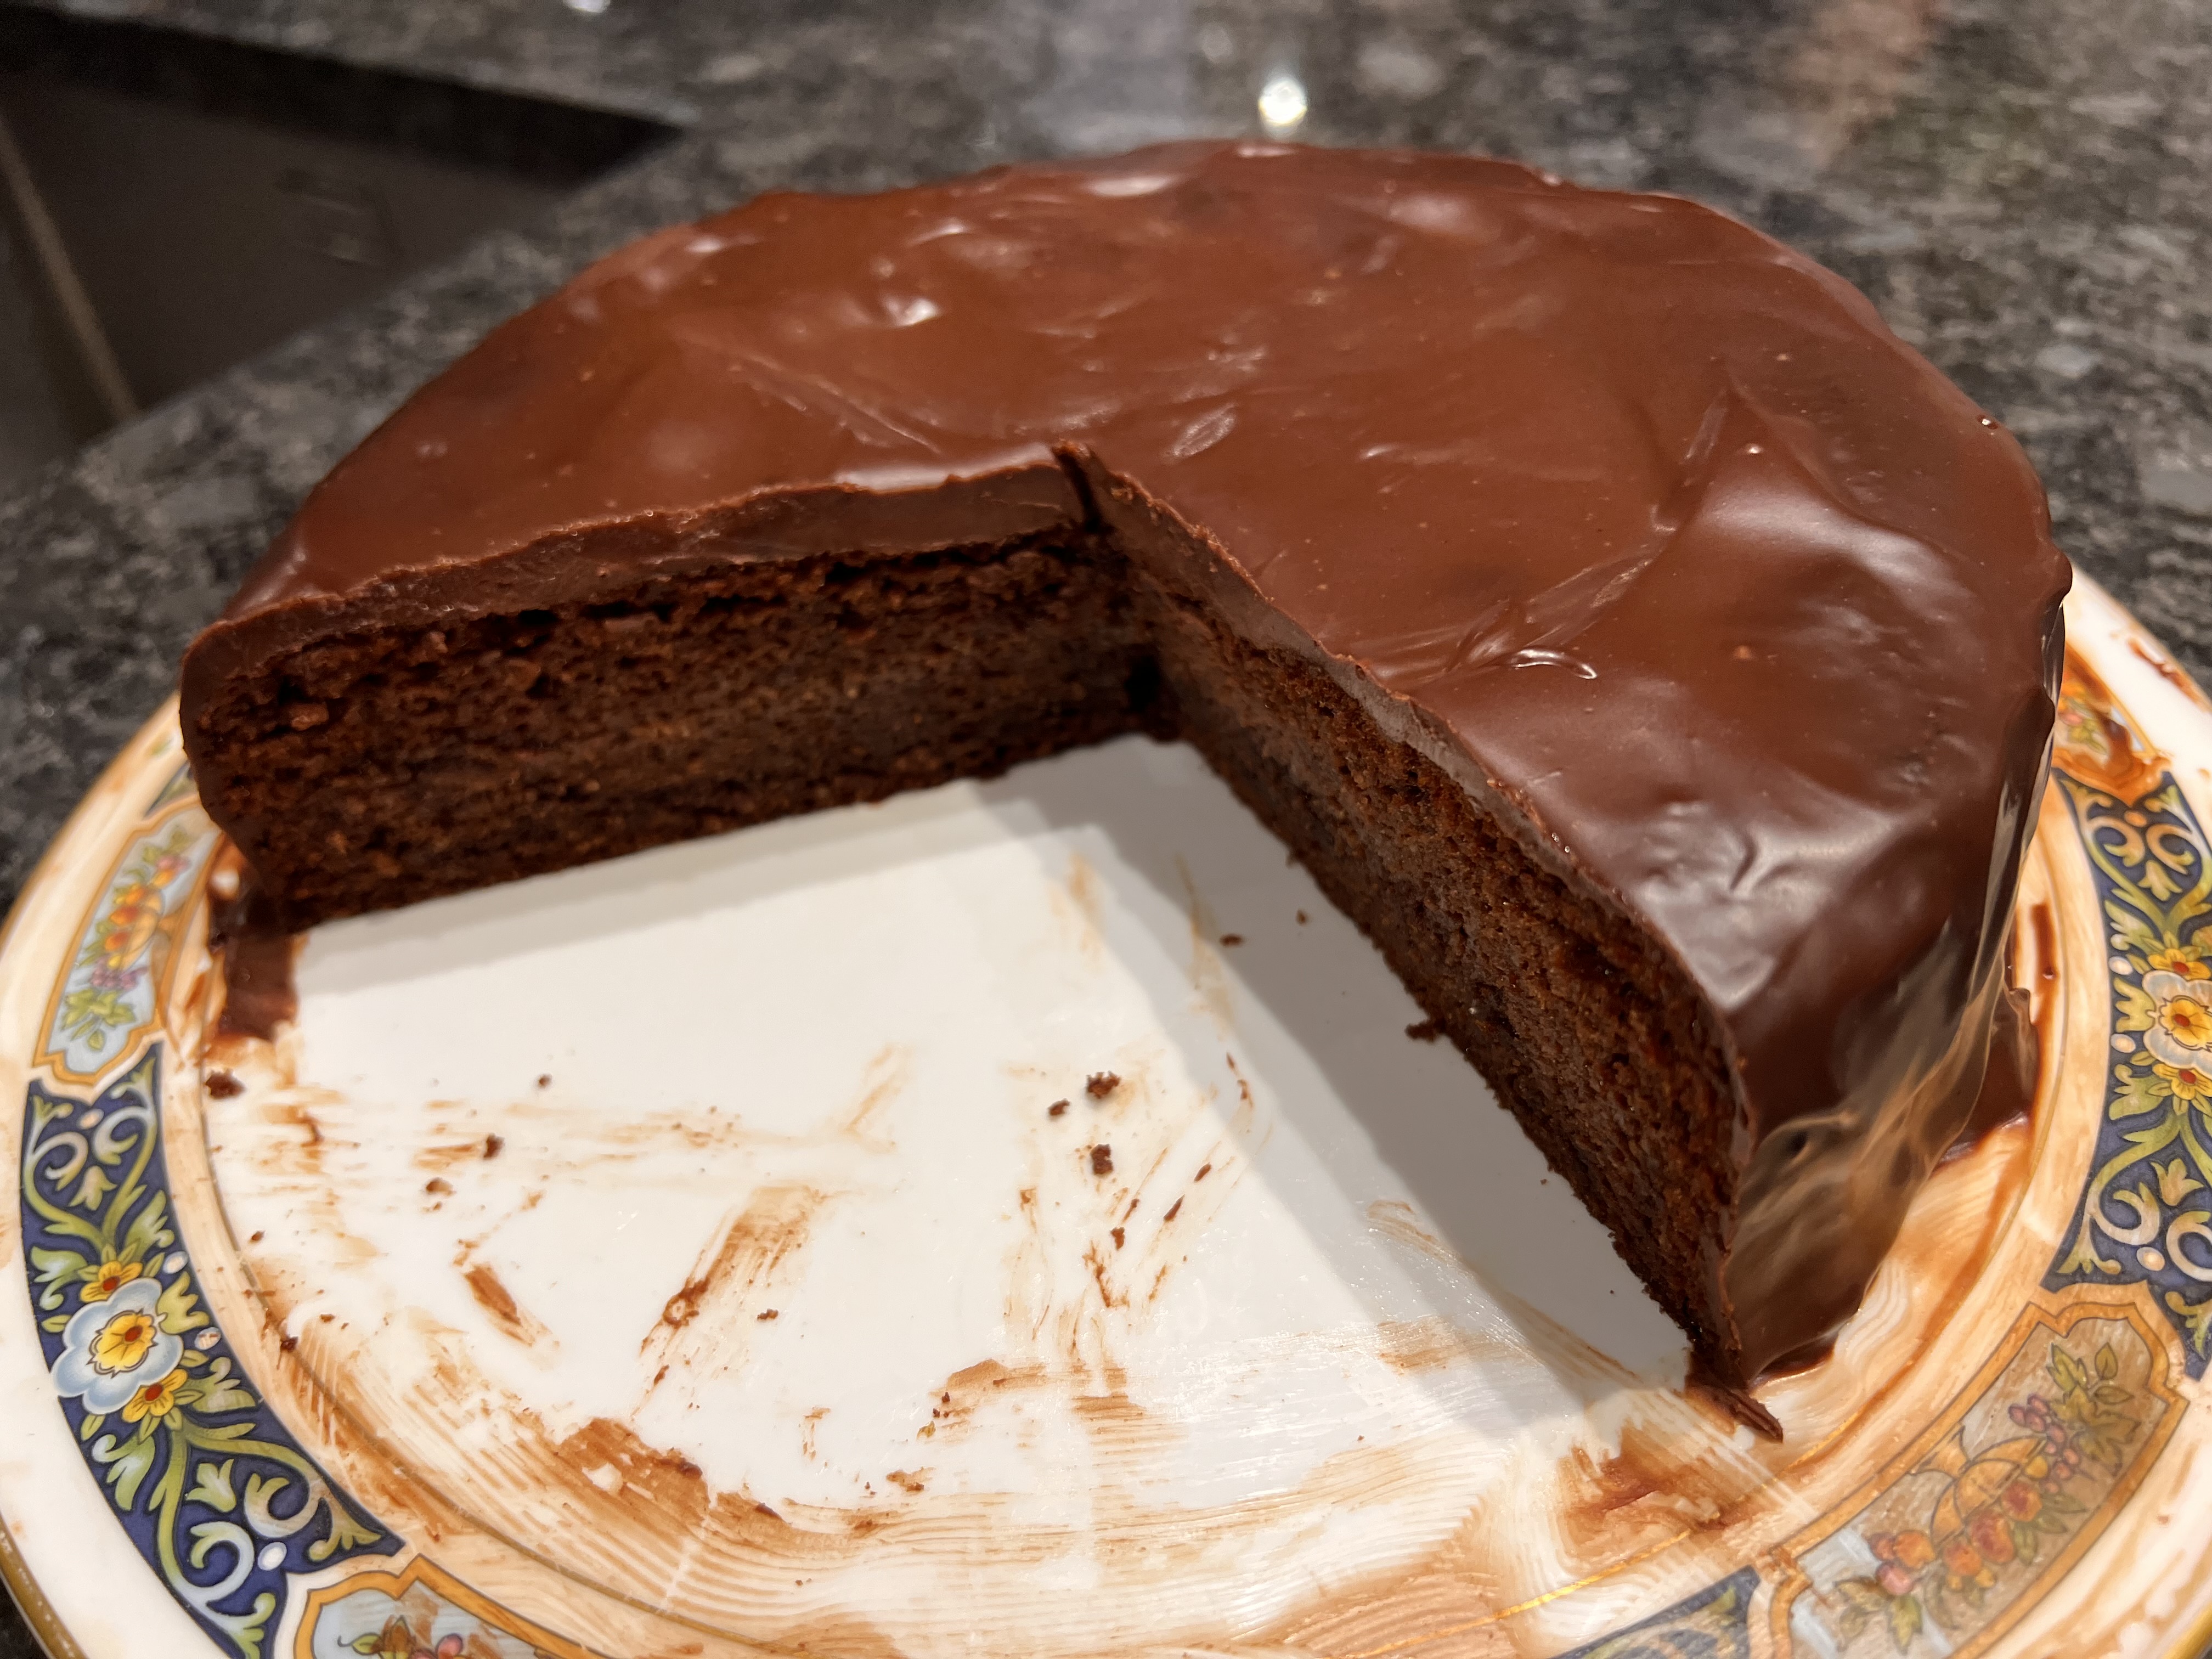
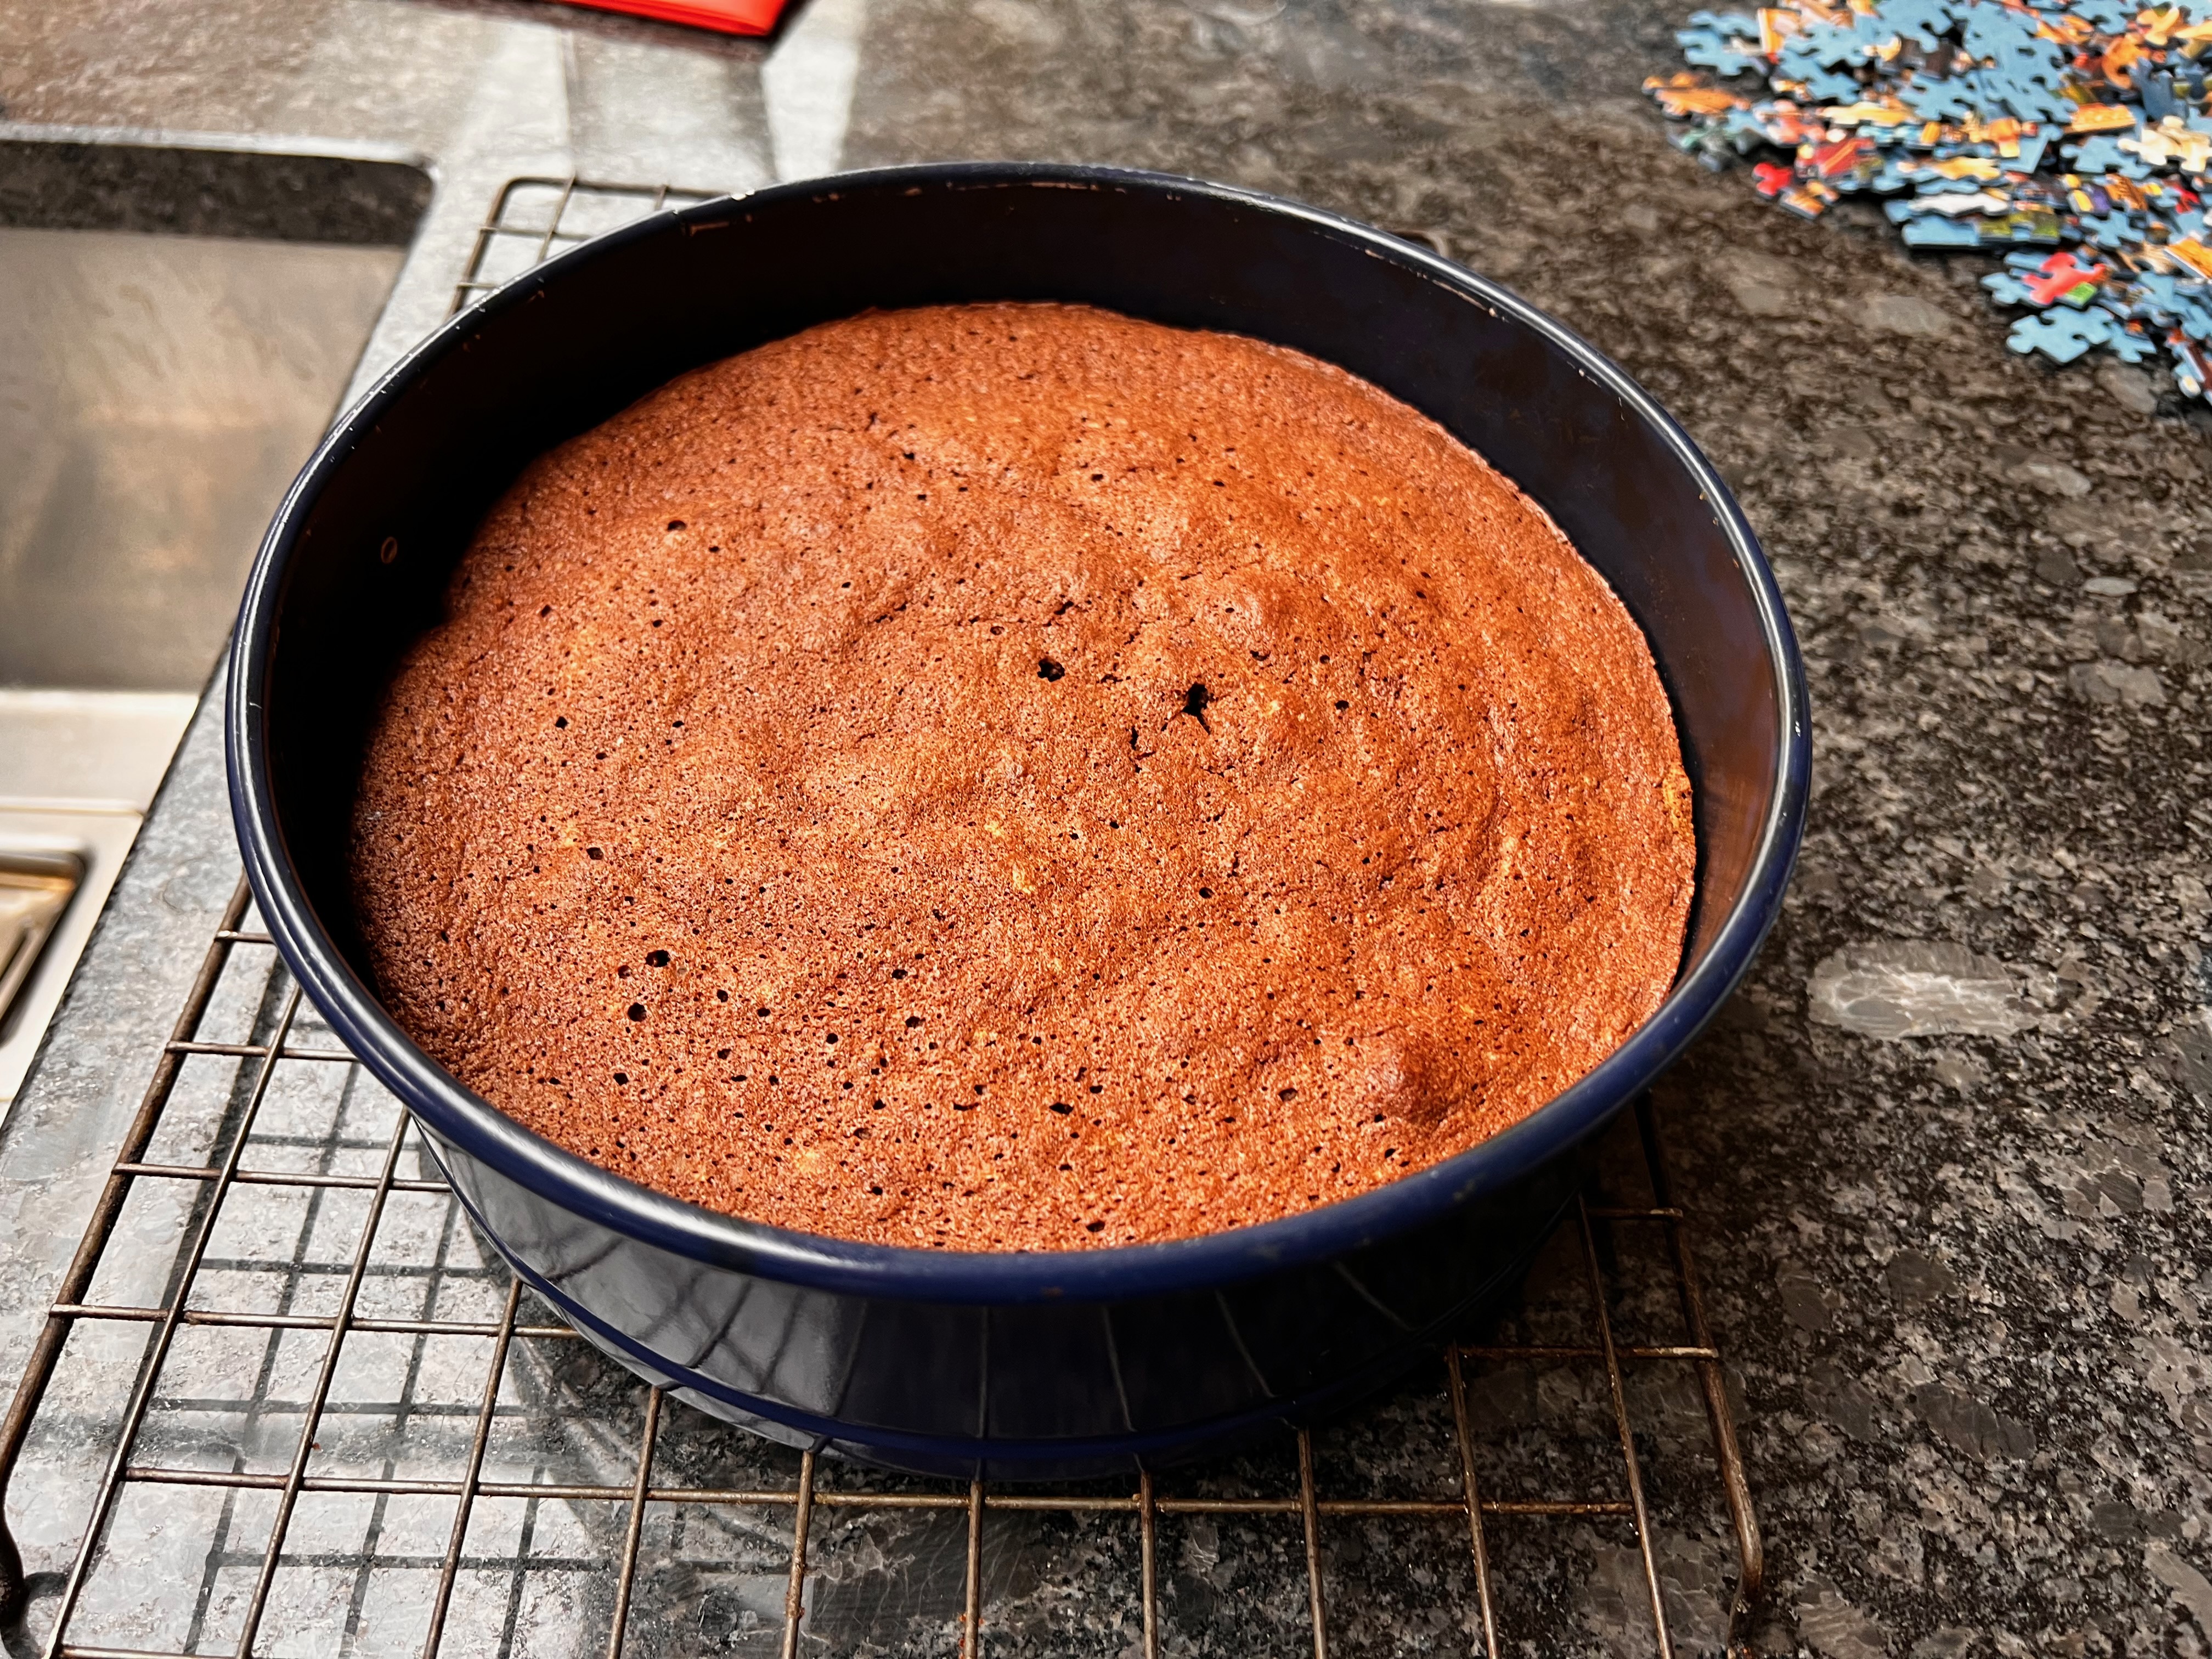
I can’t fault the results. My family proclaimed this to be better than the original, which we attribute to liking the extra flavour of the almonds and preferring the creaminess of the ganache to the extra sweetness of the chocolate icing. It’s a winner.
For completeness, here’s the modified recipe. Make it in a greased, 8-9 inch, removable-rim pan.
Ingredients
Cake
150g dark chocolate (70-80% cocoa solids)
150g allulose
30g granulated sugar
170g butter, softened
100g ground almonds
6 eggs
60g apricot jam mixed with the juice of half a lemon
1/2 tsp baking powder
vanilla essence or vanilla paste to taste (different brands are so different in strength that I can’t give an amount)
Ganache
150g dark chocolate (70-80% cocoa solids)
200g double cream
Method
Cake
Preheat the oven to 160°C fan. Grease the sides of an 8-9 inch, removable-rim cake tin with butter and line the bottom with baking paper or parchment.
Separate the eggs into yolks and whites
Melt 150g of the chocolate in a double boiler. Then leave it to cool.
Cream 120g of the allulose and the butter until the mixture is fluffy.
Beat in the egg yolks gradually until the mixture is light in colour.
Add the melted cooled chocolate.
Add the ground almonds. Add the baking powder and mix everything thoroughly.
Beat the egg whites until they are beginning to be stiff. Add the remaining 30g of allulose and beat on maximum speed until stiff but not dry.
Fold the resulting meringue mix into the cake mixture, about a fifth at a time. The weight of the almond-rich mixture will make this trickier than for a normal cake.
Bake the mixture in the pan for around 40 minutes.
Remove and cool on a rack.
Optionally, slice the top dome from the cake and set aside. Slice the remaining cake in half. Spread the jam on the bottom half and reassemble (optionally, spread jam on the top of the cake also).
Ganache
Break or chop the chocolate into small pieces (less than 1cm square) and put in a reasonably heatproof bowl. Of course, if you’ve bought your chocolate in the form of chips/pellets, this has already been done for you.
Bring the cream close to the boil, and pour it over the chocolate.
Stir rapidly and continuously until the mixture is smooth.
Cool enough that the ganache no longer runs really easily, but is still spreadable with a glossy finish.
At its heart, as Amos Oz put it, the Israeli-Palestinian conflict is fundamentally a matter of real estate: there is only one Palestine and there are two peoples who want it. The reason that both sides want the land so badly is that they have nowhere else to go. Jews have been forcibly expelled from so many countries over so many centuries that they see Israel as the only place where they can be safe. In the time that has passed since the creation of the state of Israel, the situation of the Palestinians has been shown to be little better: they might not be persecuted for their religion, but neighbouring Arab countries have shown no appetite for a mass influx of Palestinian refugees.
We can argue until the cows come home as to who has the stronger ancestral claim on the land and whose human rights have been violated by whom. But it boils down to this: in the long term, there are only three possible outcomes: ethnic cleansing whereby one side or the other is “driven into the sea” (a phrase often heard on both sides), a peace deal whereby both sides share the land and feel equitably treated (whether the “two state solution” or one of the various alternatives to it) or a stasis whereby violence continues indefinitely, perhaps ebbing and flowing in severity.
The 1993 and 1995 Oslo accords stated the objective of a peace deal. It’s reasonable to suppose that at the time, both a majority of Jews and a majority of Palestinians hoped that a listing peace could be created that would be accepted by both sides. But even then, there were contingents on both sides who had no interest in this and preferred to push for ethnic cleansing of the other side. For these contingents, it was better to accept a violent stasis, however long it might last, if it meant avoiding capitulation. On the Palestinian side, Hamas exemplifies those who believe that the Jews should be expelled from Palestine. On the Jewish side, there are substantial numbers of people promote unlimited settler expansion and severe constraints on the liberties of Palestinians: they may not be terrorists in the way that Hamas are, but they are equivalent in their desire to subvert the peace process. In November 1995, with the ink scarcely dry on the Oslo accords, one of these Jewish equivalents murdered Yitzhak Rabin, the Israeli Prime Minister who signed them.
Both of these camps are in profound agreement: they don’t want a peace deal on terms that could conceivably be palatable to the other side: you could call it an anti-peace alliance. And while both sides get very angry if you accuse them of intending genocide, they both use genocidal language and they both have the same goal: ethnic cleansing or complete subjugation of the other side. Right now, the alliance is the ascendancy, in control of the governments of both Israel and Gaza. In the early days after the Oslo accords, you might have considered these two camps as extremists. By now, in the aftermath of the October 7th attack, they are mainstream – perhaps even in the majority in their respective peoples.
Both halves of the alliance must think that everything is going swimmingly well right now. Hamas is achieving the dream of every terrorist organisation, to provoke its opponents into acts of revenge and repression so horrible that anybody neutral considers them to be monstrous (for a clear analysis of this kind of mindset, read Louise Richardson’s What Terrorists Want, written in 2007 but still spot on today). The Israeli far right are in equally good shape, able to demonstrate to their followers that Hamas are monsters who must be eradicated at all costs – even if those costs include taking a large chunk of the civilian Palestinian population with them.
So how do I – born in the UK of Israeli parents, Jewish by race and atheist by religion – feel about supporting Israel in all this? For a start, I accept the fundamental Jewish argument of “we need a safe haven, and Israel is it.” I don’t believe for a moment that antisemitism has been consigned to history: even in supposedly liberal countries like the UK, it’s easy to detect classic antisemite language and behaviour both in the far right and the far left, while in most Muslim countries, antisemitism is a majority viewpoint. (By the way, Islamophobia is even more present in the West, a fact which doesn’t affect the argument here but shouldn’t be ignored).
But the way Israel is waging its war against Hamas is a godsend to the antisemite cause: it’s daily proof for everyone who considers Jews to be bloodthirsty monsters, giving credence to centuries of slanders from Christ-killing to the blood libel. If we want to persuade the world to hate us because we’re Jews, there’s no better way to do it than to massacre thousands of Palestinian civilians. It doesn’t matter whether individual killings are deliberate, collateral damage from operations against armed enemy fighters, or starvation by destruction of infrastructure. A civilian death is a civilian death. If flushing out a terrorist organisation requires the killing of tens of thousands of civilians and the destruction of their entire country, that isn’t self-defence, it’s revenge.
Sadly, it was a predictable response. Writing in Le Monde just a week after the Hamas attacks, historian Vincent Lemire described what he called “the double trap” set by Hamas: the military trap of enticing Israel into warfare in difficult territory and the moral trap of provoking Israel into an excessive response. The Israelis may have been smart enough to avoid the worst of the military trap, but they have fallen headlong into the moral one.
Unless both sides commit to peace, the cycles of violence in Palestine are doomed to repeat themselves. This may be the worst of the cycles in recent times, but it will not be the last – however much the Israeli military might wish to believe it so. The “war to end wars” idea didn’t work in Europe and it won’t work in Palestine either.
What Hamas did on October 7th was monstrous, and their continued holding of Israeli hostages remains so. But before I can support Israel in their war against Hamas, Israel needs to do three things: stop the mass killing of civilians in Gaza, reverse the settling of Palestinian lands in the West Bank and display some genuine intent to make peace on fair terms. The present Israeli government might conceivably do the first of those things. It looks unlikely in the extreme that they will do all three. I can only hope that some political cataclysm happens in Israel that will bring in leadership of a very different kind.
The Israelis are my people. I hope that one day, I can once again be proud of this. But I fear that’s a day I won’t live to see.
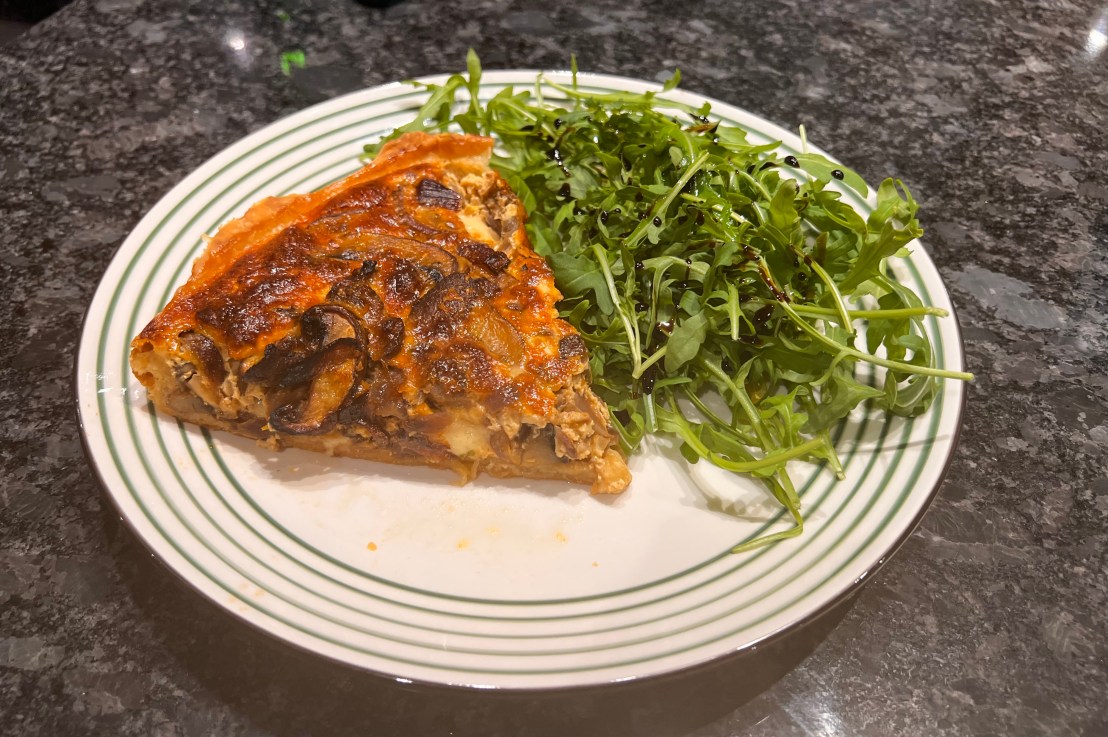
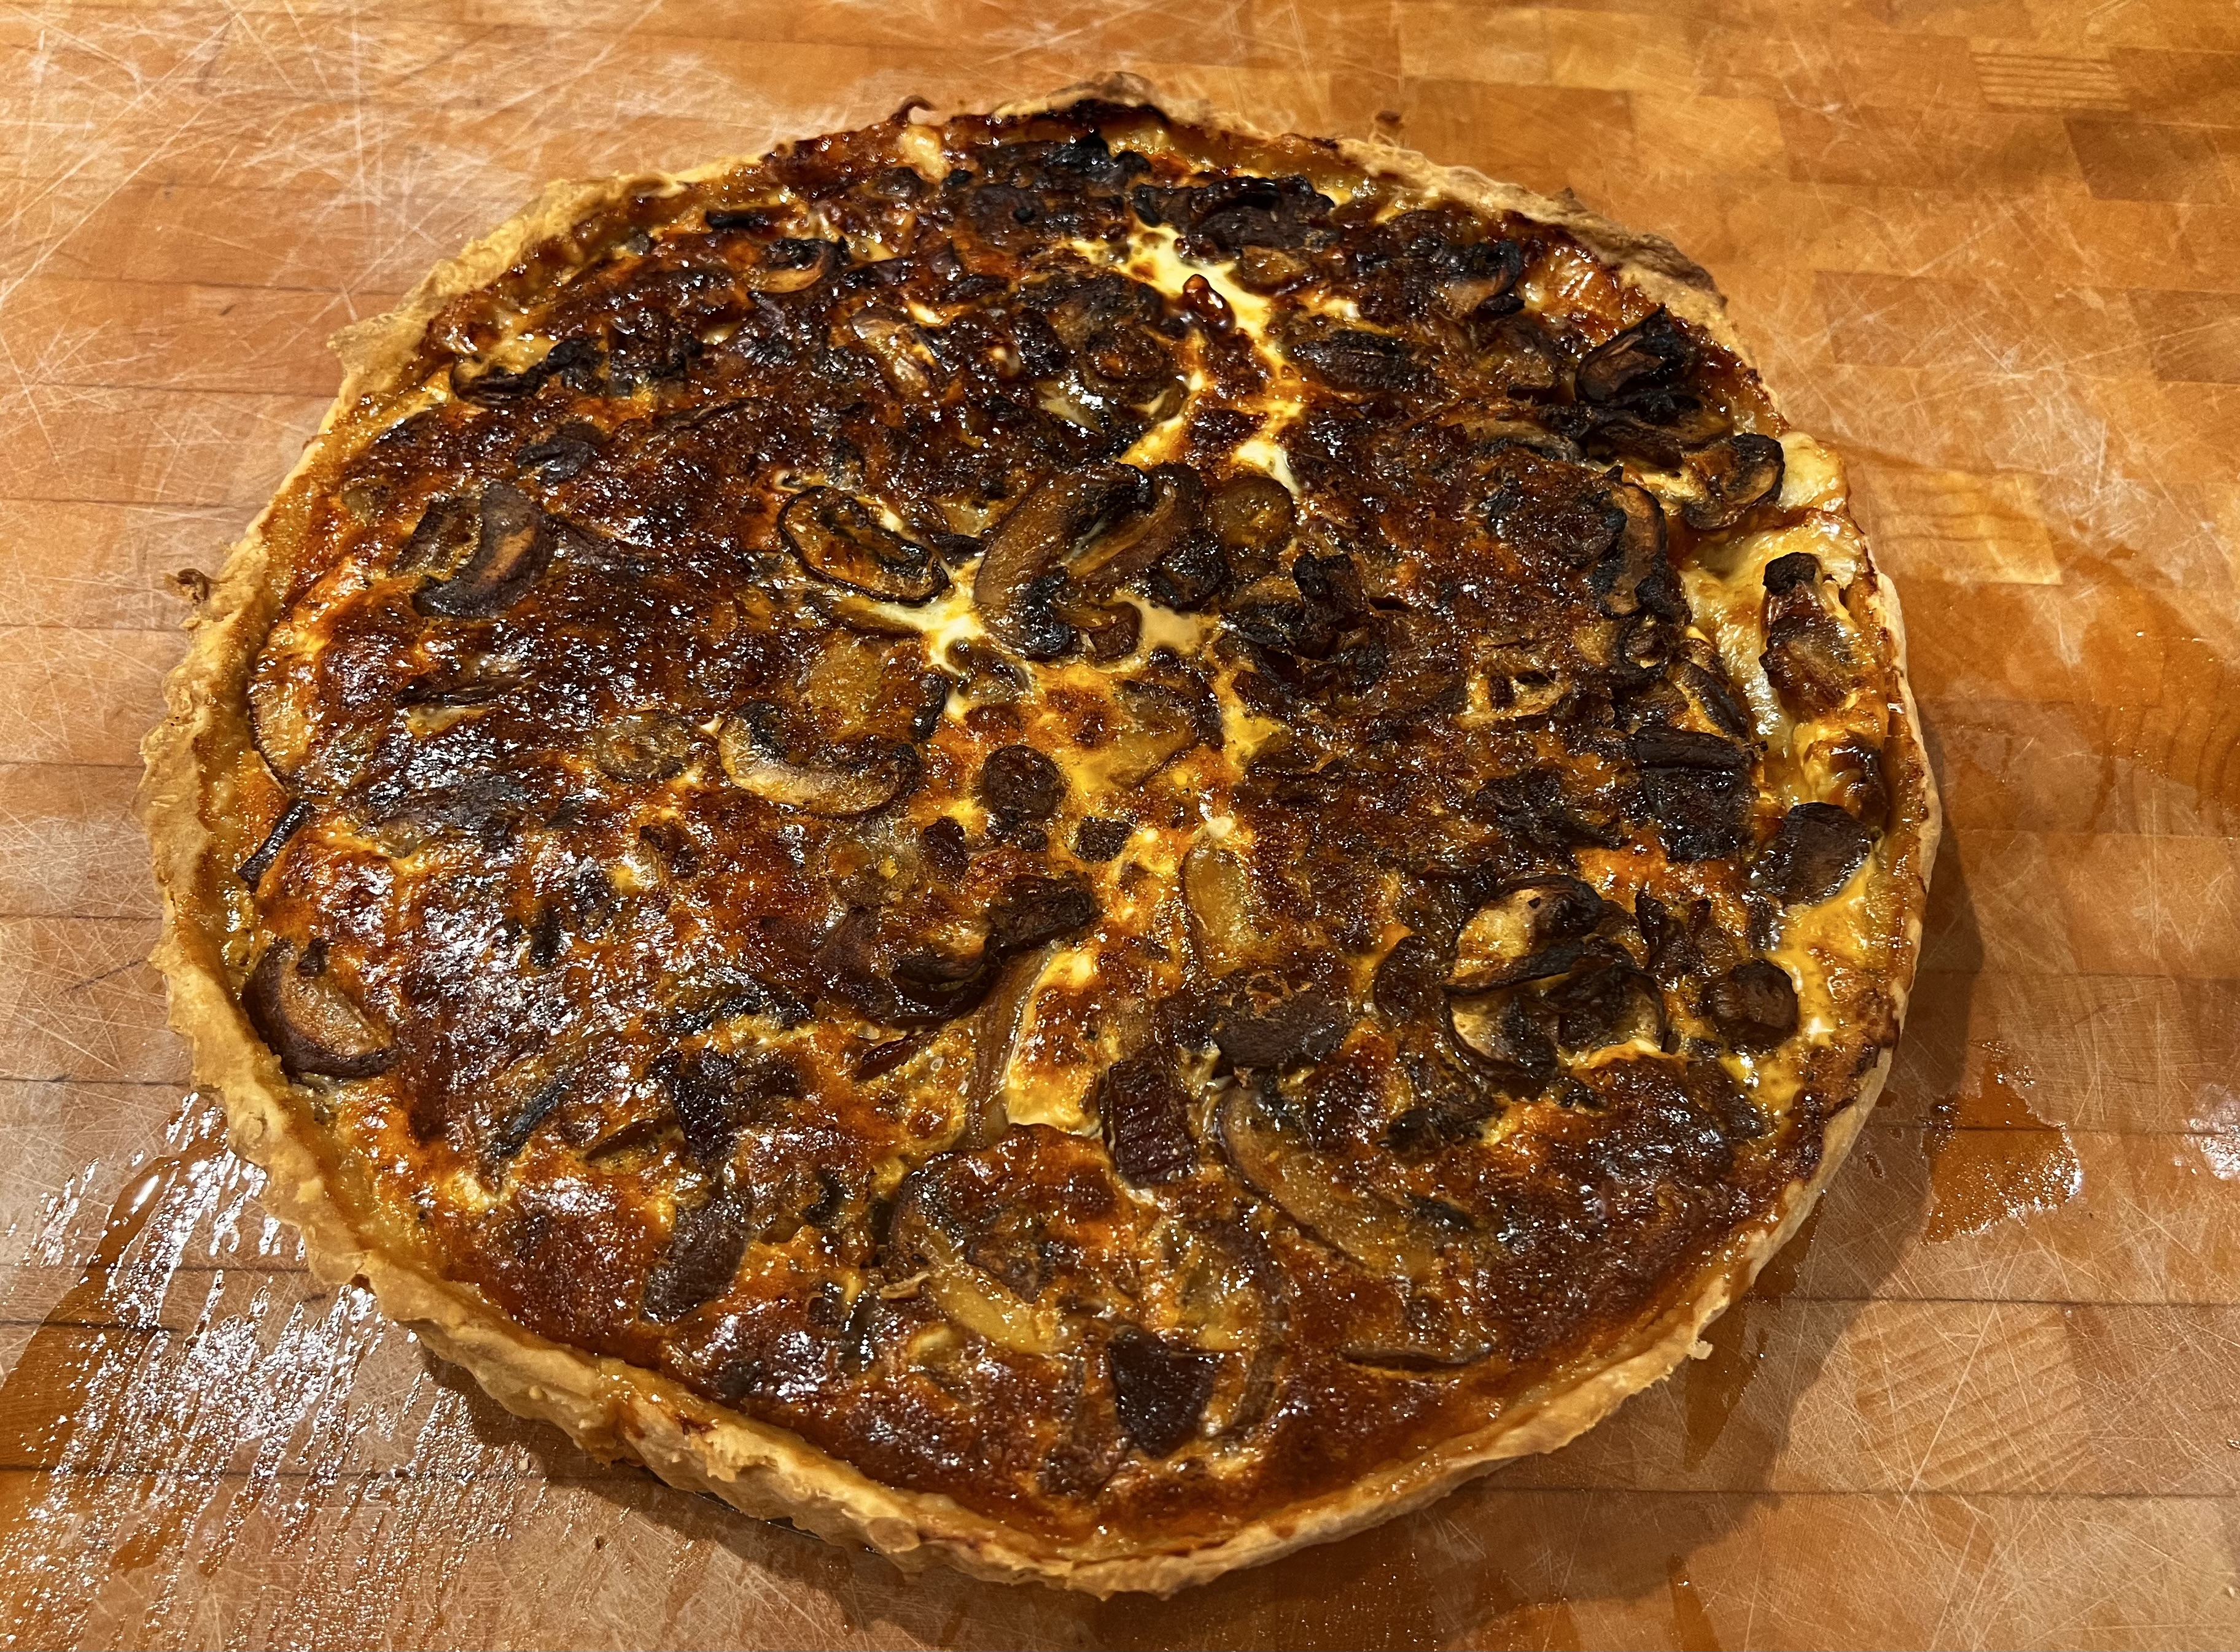
For anyone old enough to remember the 80s and Bruce Feirstein’s Real Men Don’t Eat Quiche: this particular real man not only eats quiche but also loves making them. But I’m picky about what sort of quiche: I’m not particularly fond of the thick version that’s essentially pastry-coated set custard, possibly with a few flecks of bacon. The version I love has thin, crisp pastry and is packed with flavourful ingredients (the egg binds it all together, but isn’t the principal component of the dish) and it’s backed to a gorgeous golden brown.
I make a bunch of variations on this particular theme. This Mushroom and Comté tart is my all time favourite dish to serve to vegetarian guests, but I also make versions with different cheeses and various nuts, peppers or other vegetables. If I’m not serving vegetarians, I will often add bacon or chorizo; if in the mood for spice, different chilies and peppercorns can put in an appearance.
This recipe is on the luxury end of ingredients: the truffle oil at the end is very optional; Cheddar is a perfectly good substitute for the Comté, albeit with a different flavour profile. The dried porcini can get very expensive in the UK (we buy them in bulk during trips to Italy): a teaspoon or two of white miso paste will add plenty of extra umami at noticeably lower price.
With the aid of a side salad or two, the quantities here will serve six generously as a main course and, depending on how hungry your guests are, will do 8-12 for a starter.
For the pastry, I use a stand mixer to combine the butter and flour. You can also use a food processor, or you can just use your fingers; whichever you choose, try to keep the ingredients cold.
Pastry
250g plain flour (preferably OO)
2g salt
125g unsalted butter, cold from fridge
30g yoghurt (I used Greek)
2 eggs
Put flour and salt into a mixing bowl. Cut the butter into small cubes (perhaps 5mm) and add them.
Mix the flour and butter until it reaches the texture of coarse breadcrumbs.
In a small bowl, beat the eggs and yoghurt together, then add to the flour/butter mixture.
Mix until well combined into a smooth dough. Knead a few times with your hands, wrap in cling film and put in the fridge, preferably for 30 minutes or more (this will develop the gluten which will make the pastry stretchy and easier to roll).
Filling
Dried porcini to taste (I use around 15-20g)
Olive oil for frying – perhaps 20ml
1 medium red onion (could use brown; could use a larger onion – 200g peeled weight)
400g chestnut mushrooms
1 tsp paprika (or choose your favourite seasoning: I’ve used different chilies and chili flakes; the best was some peppercorns my daughter brought home from a holiday in Madagascar).
1 tsp dried oregano
A handful of garlic chives (optional, or could choose some other herb)
Salt and pepper to taste
Chop the onions finely
Slice the mushrooms
In a small bowl, cover the dried porcini in hot water and leave them for a few minutes to rehydrate
In a deep frying pan or wok on medium heat, fry the onions until transparent
Drain the porcini, add them and fry for another minute or so
Add the sliced mushrooms, paprika and dried oregano; fry until they are cooked and most of the liquid has evaporated.
Add the garlic chives, salt and pepper and mix; take off the heat
Final assembly
200g Comté cheese (Gruyère works fine; so would Beaufort; Cheddar would be a good cheaper alternative)
4 eggs
Butter for greasing the tart tin
Flour for rolling
200 ml milk
30g Parmesan, grated
Truffle oil (optional)
Preheat oven to 200℃ fan
Chop the cheese into cubes, around 1cm.
Separate one egg: you’ll put the white into a small bowl and the yolk into a medium-to-large bowl. Put the other three eggs in with the yolk.
Grease your tart tin with butter
Roll out your pastry and line the tart tin. Prick the bottom with a fork.
Brush the pastry with the egg white, then put any left over egg white in with the rest of the eggs.
Beat the eggs; add the milk and mix; add the Parmesan and mix
Scatter the cheese cubes evenly across the pastry
Scatter the mushroom filling evenly across the spaces pastry, discarding any excess liquid.
Pour the egg/milk mixture over to fill the remaining gaps
Bake until the surface is a deep golden brown, around 35 minutes
Optionally: drizzle the tart with truffle oil
Serve lukewarm to hot. A little rocket, oil and aceto on the side makes a good garnish.
Like many people of our age, we’ve become more and more conscious of climate change and the world we’re bequeathing our children. We can’t claim to be paragons of green virtue – we’re still doing far too much flying to even approach this – but we have been taking some of the right steps, and two years ago, we made the leap and abandoned the internal combustion enging: our first electric car, a Tesla Model 3 Long Range, was delivered exactly two years ago, on 30th November 2021.
Here’s a potted assessment, not just of the car itself, but of the experience of owning and running a Tesla. The short answer is that I’ve loved it: the car is great and the charging infrastructure has worked superbly. That said, there’s plenty to criticise in the user interface, not in the basic “iPad on wheels” concept, but in many details which are either misconceived or just plain don’t work.
The car
The biggest surprise about the Model 3 was quite how good a car it is mechanically. Leave aside the technology bluster, the computer screen, the blistering acceleration: the Model 3 handles better than any other car I’ve owned. You get this overwhelming feeling that when you turn the wheel to point the car in a particular direction, the car will follow immediately and precisely. There’s no resistance to your hands, there’s no lag, there’s no discernible roll of the car’s body, not the slightest hint of uncertainty. The response to your control is precise and immediate.
The big point of difference between the way you drive a Tesla and the way you drive petrol or diesel cars is the regenerative braking. When you start taking your foot from the accelerator, once you get to the point where the car is no longer accelerating, it gradually starts to brake. This means that you don’t really use the brake pedal at all in normal driving: your right foot acts as both parts of the “go faster / go slower” control. You might think this takes some getting used to, but I didn’t find this: I was completely comfortable within minutes. And once you’re used to it, that combines with the car’s basic responsiveness to make it a real joy to drive.
As has been well documented, the acceleration is phenomenal. I’ve only floorboarded the car once, largely to see what would would happen – and the thing that transpired was the certainty that my back and neck would start complaining if I did it regularly. Effectively, you have an on-off switch which says “overtake now”. Weirdly, this means that I drive the Tesla far less aggressively than previous cars: knowing that I can overtake just about anything else on the road at will means that I don’t have to do any of the jockeying for position that drivers often do. There’s never a need to drive up close to someone’s bumper to prepare.
The modern features you expect work well, like electronic locking and remote boot opening (or trunk, as Tesla insist on calling it – one day, they might do a British English option). Having the car warm up to the right cabin temperature at the right time every morning is a genuine luxury. Admittedly, it took me a while to get used to abandoning the car key and simply wandering up to the car with a phone in your pocket, expecting it to unlock. And finally, we find the car very comfortable – the seats are supportive and adjust in all the right places.
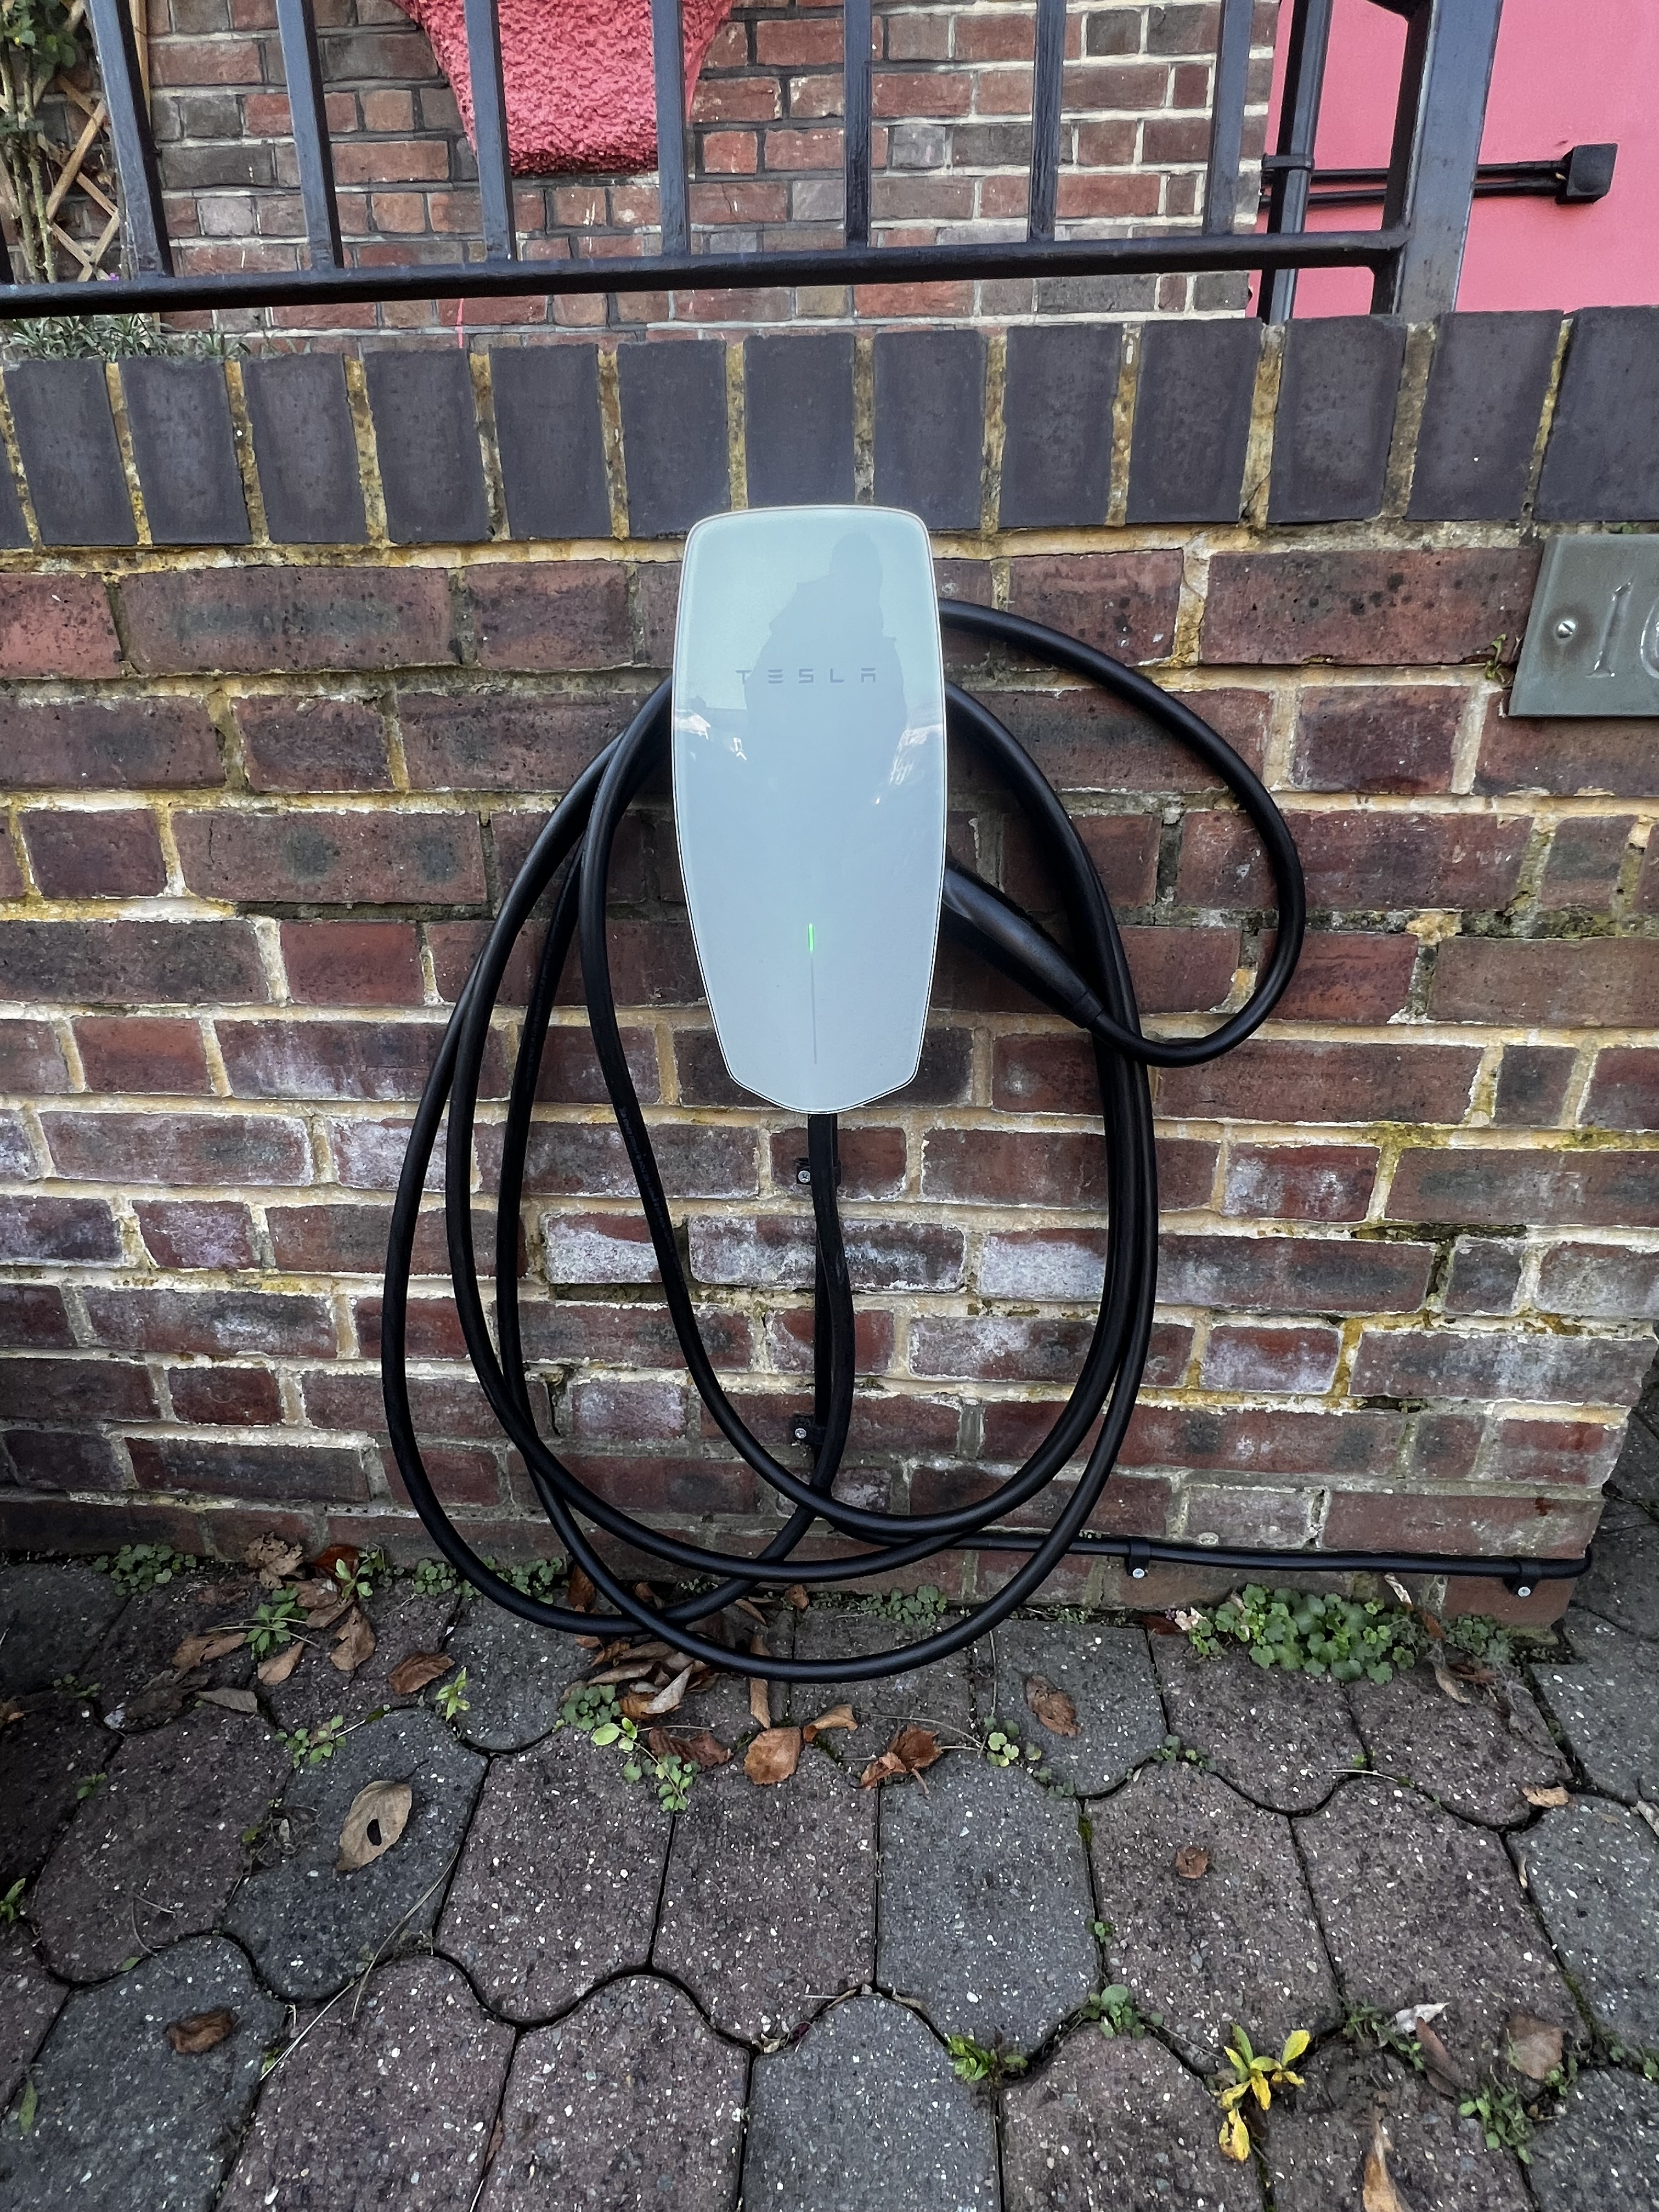
Our home charger
Range anxiety – or not
Our biggest concern about going electric was range anxiety: we do a regular round trip to Devon of around 250 miles each way and we’re often a bit pushed for time, so spending hours charging the car en route isn’t an option. So before buying the car, we did the trip in a rented Model 3.
What we found is that the Tesla Supercharger network works extraordinarily well. The chargers are very fast indeed: it’s rare for us to spend more than 20 minutes charging the car. That’s a very small overhead on top of the ten minutes we’d spend on a stop for the toilet and either a drink or a brief stretching of legs (we’re old enough that any long car journey carries the risk of our backs stiffening up). Our overall journey time to Devon hasn’t changed materially.
The ultimate test of range anxiety was the 2,000 mile road trip we did around France this July. Supercharger coverage in France isn’t quite what it is in the UK, so we needed a bit more preparation in the shape of acquiring a Chargemap card, which gives you access with a single RFID card to almost all the other commercial chargers around. Several of the hotels we stayed at recharged the car for free overnight, and there was a nice surprise when it turned out that the city of Aix-en-Provence provides free EV charging in their public car parks (although, admittedly, these are pretty expensive in the first place).
The car’s satnav is particularly good at this: dial in your destination (or even a couple of destinations ahead) and it will plan your supercharger stops. Then, when you’re on the road and approaching your supercharger, it will precondition the battery for ideal charging performance.
When touring, it’s worth noting that some supercharger stops are far nicer than others in terms of what facilities there are in the environs. Our stop in Valence was perfect because it was at lunchtime and the Novotel has a really nice brasserie. The Beaune supercharger allows a lovely 10-minutes-each-way walk into the city’s gorgeous old centre. The Amiens supercharger was decidedly less pleasant, with a lot of car park to walk through to get to the nearest toilet, in a MacDonalds. We discovered, rather late in the day, that an icon on your satnav allows you to find superchargers on your route so that you can Google them and see which ones look more salubrious; similar functionality is available on the phone app if you know where to look, off the bottom of the Location tab.
The user interface
If the Tesla is an obviously good answer to the “EV versus petrol” debate, its user interface is far more controversial. Some people will love the clean design that results from getting rid of as many manual controls as possible and putting them into a single iPad-like flat screen to the right of the steering wheel. For others, this will be unfamiliar and thoroughly unpleasant.
I’m somewhere in between. I’m perfectly happy to have all the controls on single flat screen, but there are an awful lot of things wrong in the way Tesla have done it. The good thing is that for most routine stuff, whether it’s setting up the climate control, checking tyre pressures or playing music from a bewildering variety of sources, the functions are easy to find and all work pretty well.
The single biggest problem is that I’m 65 years old, so I need reading glasses (but not distance vision ones). The speed at which my eyes can refocus between the screen and the road is limited and most of the fonts are so small that there’s a great deal of the UI that I simply can’t use while the car is in motion. A couple of months after I bought the car, Tesla relased an upgrade to allow me to select a larger font size, but that made only a modest difference.
This would matter less if the voice recognition worked better. Whether because of my British accent or vocabulary or because of something more fundamental, most of the time, I simply can’t get the car to understand what I’m saying, even for apparently simple commands like “windscreen wipers off” or “play music from Tidal”. Worse, the car often misinterprets my commands and does something completely unexpected, which you really don’t want to happen when you’re driving at speed.
Even at rest with reading glasses, the font size is also an issue when doing satnav searches: too often, you get a list of choices which are too long for the search results box and therefore get abbreviated with a “…” on the end. The effect is that you’re being presented with up to a dozen search results which look identical and which, on a bad day, can be several hundred kilmetres away from each other.
Future self-driving
For me, the most blatantly stupid aspect of the UI is the decision to devote the most important real estate on the screen – the third of the screen on the side closest to the steering wheel – to a 3-D visualisation of the car AI’s view of its surroundings – vehicles, pedestrians and cyclists, lane or edge-of-road markings. I assume that the motivation is to encourage the idea that the car is so good at modelling what’s around it that one day, we’ll have enough confidence to let it drive itself for us (if any Tesla employees are reading this who know better, feel free to disabuse me and explain the reality).
The trouble is, the visualisation is comically inept. Cars and lorries appear and vanish at dizzying speed. There’s no consistency I can identify as to when I’m likely to see pedestrians and when I’m not. The effect is the exact opposite of what’s intended: if the current display is the best model Tesla can create of the car’s surroundings, I’m not going to touch self-driving with a bargepole. It really irks me that this useless display is taking up the prime screen real estate where what I actually want is a large, easily readable speedometer, with some extras like the current speed limit, my journey time so far, expected arrival time and expected battery level at arrival in a large enough size that I can read them quickly. And I really would have thought that after going to the same car park barrier every day for a year, the car would have learned that no, I’m not going to drive straight into its box of electronics, and no, it doesn’t need to beep at me.
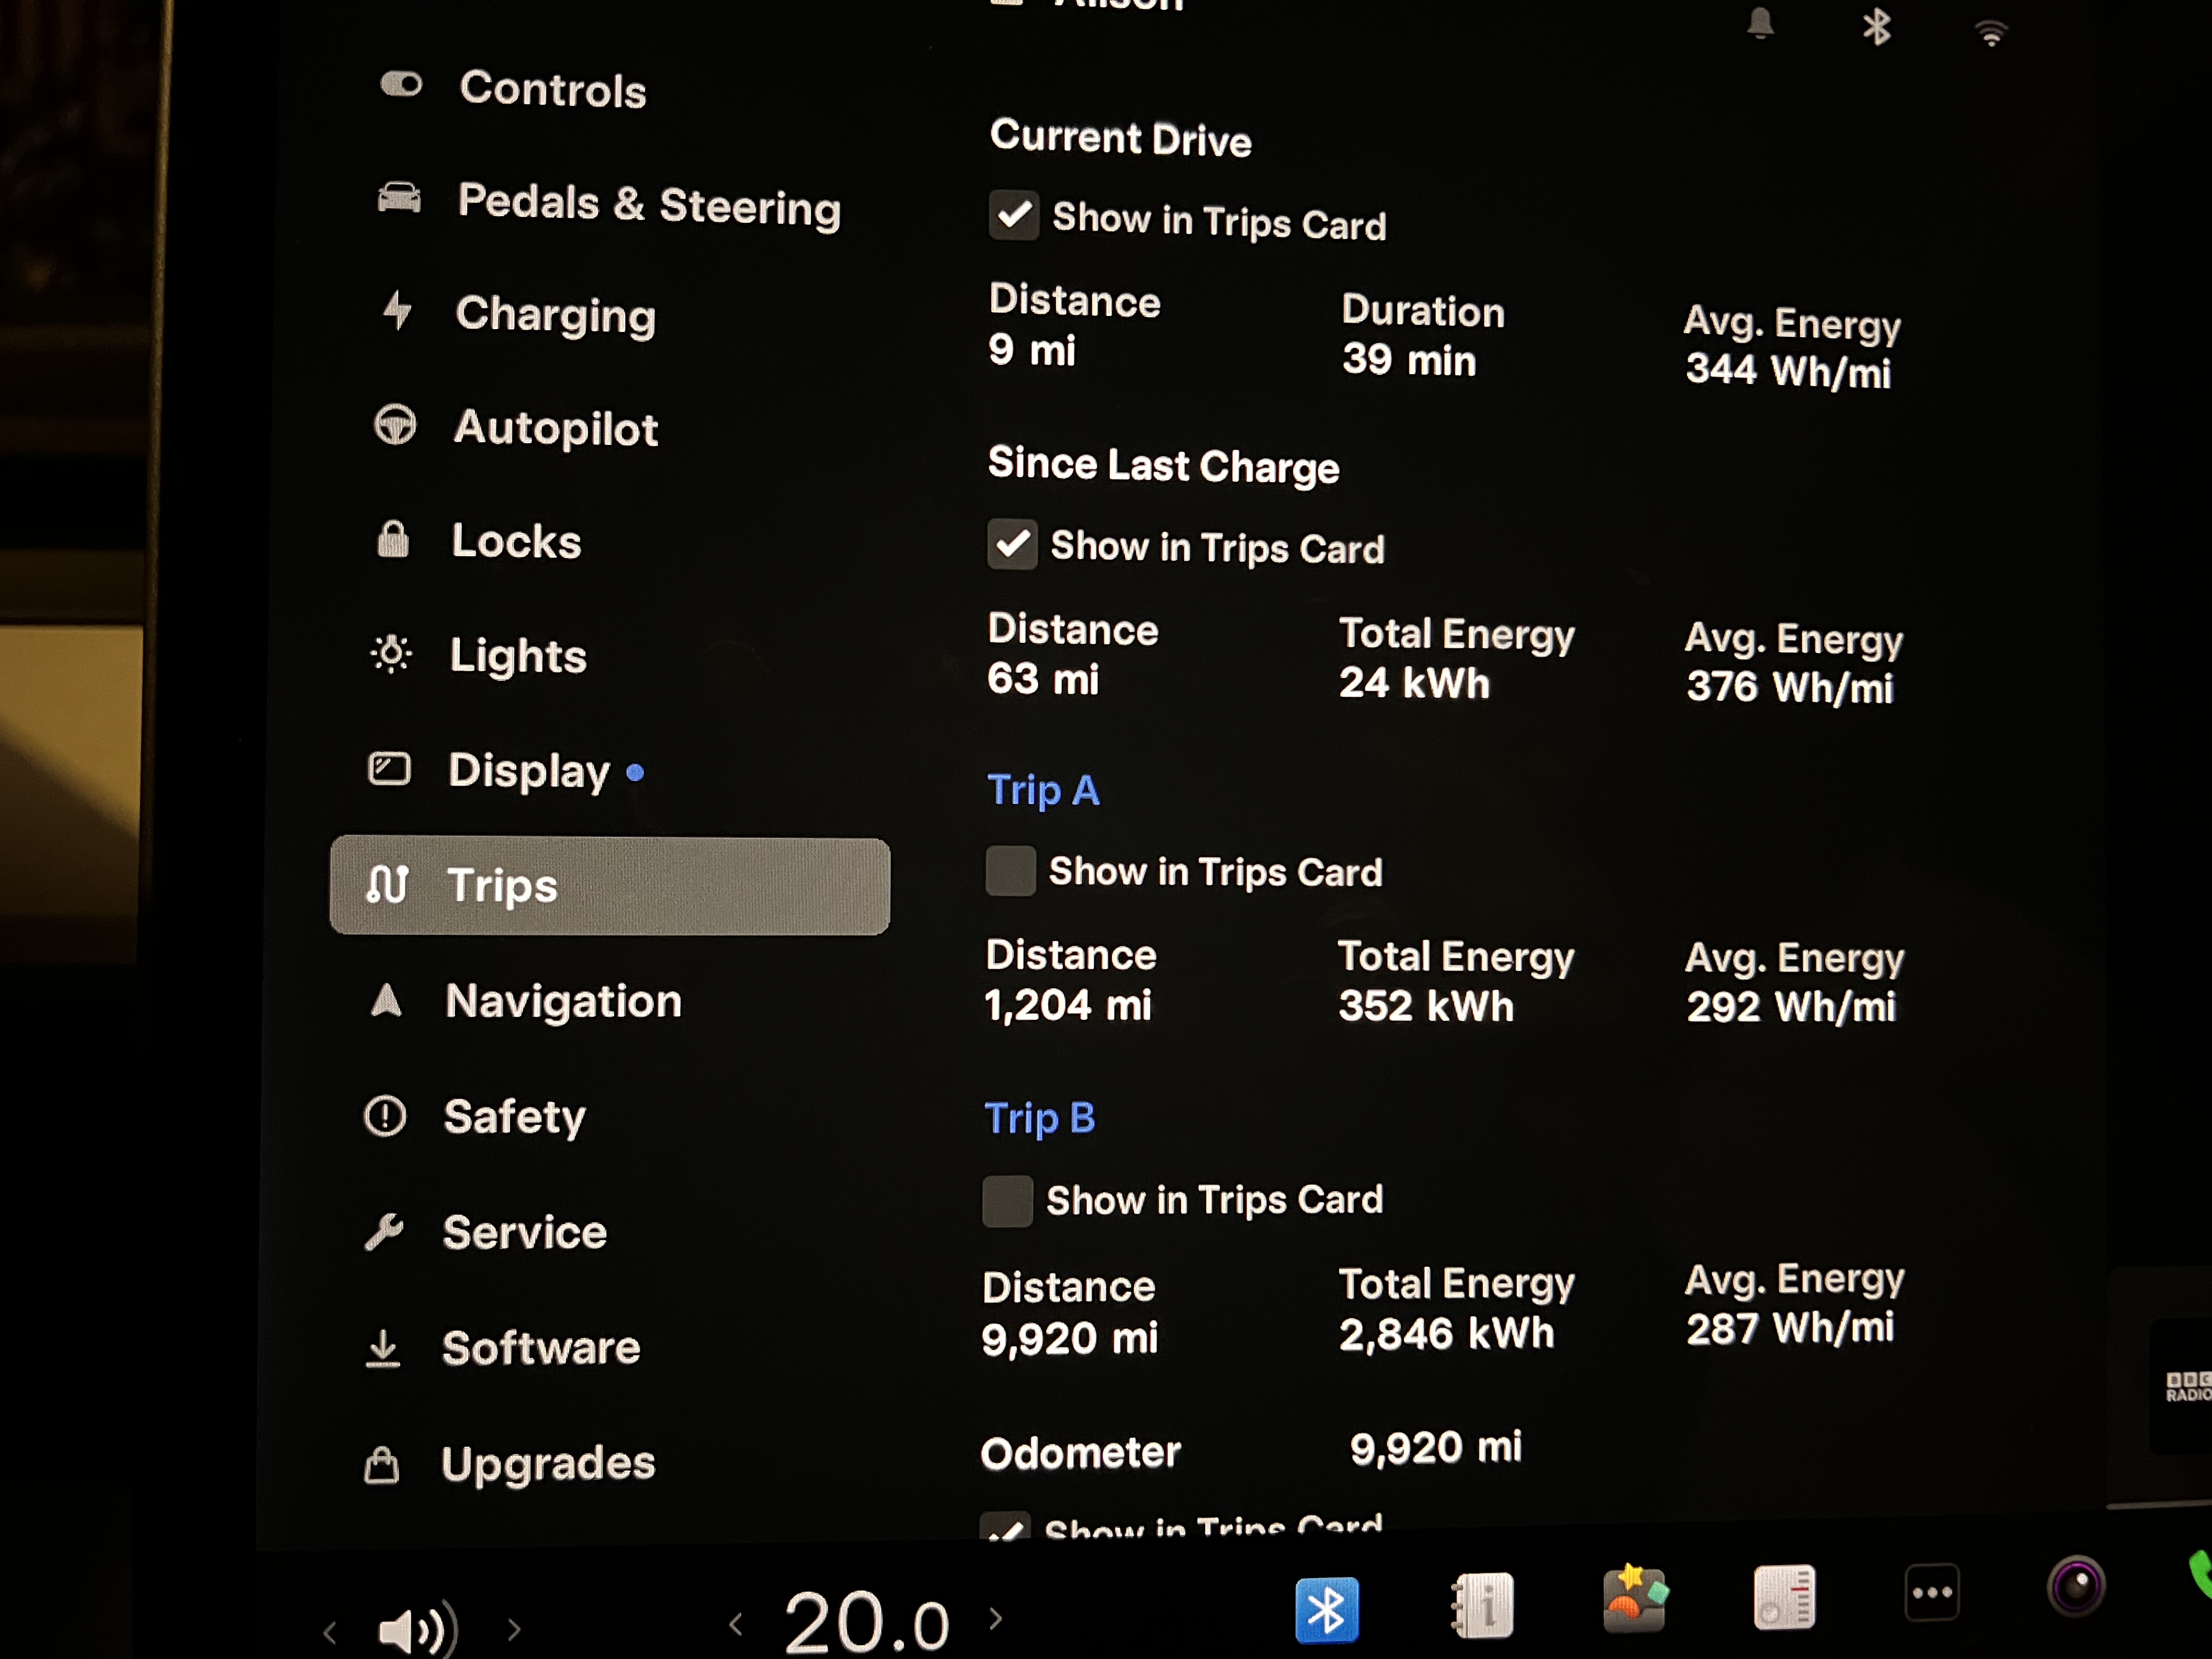
Some statistics
We’ve driven 9,920 miles in the two years we’ve had the car – a smidgin under 5,000 miles per year. The car reports our total energy use at 2,846 kWh, or 287 Wh /mile. At our current overnight electricity price of around £0.185 / kWh, that’s ust over 5p of electricity per mile, which strikes me as staggeringly good. To be honest, at our relatively low mileage, depreciation and insurance are going to be a far more significant cost than fuel.
For our France trip, a mixture of superchargers, other paid-for chargers and some free recharges, we ended up spending €0.09 per mile; if you ignore the free recharges, the figure goes up to €0.11.
The buying process
I need to mention that during the process of purchasing the car, Tesla’s customer engagement was dire. Sure, the online screen to set up your account and select the options you wanted worked fine. But navigating their phone system was horrific, there was really no idea given of when the car might arrive, and it wasn’t pleasant to discover that the pickup point closest to my home got mysteriously discontinued at some point during the ordering process. For a £50,000+ purchase, I’d have expected someone to answer the phones and give me a bit of TLC. They didn’t.
My overall impression is that their view of customer service is that it’s a cost centre: their strongest desire is to get you off the line and stop costing them salaries. Ensuring that you get a good experience to associate with their brand doesn’t seem to something that bothers them.
In summary
Quite simply, the Model 3 is the best car I’ve ever owned. It’s lovely to drive, staggeringly fast, practical, comfortable, reasonably attractive and its fuel costs are incredibly low (particularly since I have solar panels at home). Its charging network is second to none.
It would be great if Tesla had a serious rethink about their customer engagement and dealt with the dafter bits of the user interface. But I guess you can’t have everything. So far, therefore, all things considered, I’m not suffering from anything resembling buyer’s remorse.
There’s a book I’d like to read. Unfortunately, I haven’t found it yet, and I’m not even sure it exists. If it doesn’t, I should probably try to write it, although that would take a lot of work acquiring the necessary knowledge or finding willing interviewees. Which may be impossible anyway.
Some background. I have been Type 2 diabetic for around 35 years. Most of that time has passed easily enough, I am glad to say: I have been fortunate enough to be broadly symptom-free and to have received good medical advice and care.
Or so I thought. A couple of years ago, it turned out that several key pieces of “standard knowledge” I had been given about diabetes were wrong: (1) my instances of feeling desperate for food (which I called “sugar lows” even if they weren’t) were caused by my diabetes; (2) I should ingest most of my calories from carbohydrates; (3) I had no choice but to expect ever increasing doses of various drugs until the day I die. The facts are the opposite: my sugar lows were caused by the gliclazide I was on; a carbohydrate-heavy diet is a terrible idea for a diabetic and in most cases, type 2 diabetes is at least partly reversible (if we’re nit-picking, doctors seem to prefer the word “remission” to “reversal”). I’m now on a very different path, with a focus on weight loss, a low carbohydrate diet and lower drug doses.
I now have a superficial understanding of some of the processes involved in my metabolism: what foods are converted into blood glucose, how my liver acts as a glucose storage device under the control of insulin produced by my pancreas, and so on. But the crucial word here is “superficial”: my mental landscape looks like a few islands of knowledge within a sea of ignorance. By what mechanism does my body burn fat? When I’m exercising, what’s carrying energy to my muscles and how do they use it? What makes me get hungry or feel full? By what mechanism does my blood pressure rise or fall (and why does it go up and down so often)? I understand very little about any of this.
So far, I’ve read through three books that claim to shed light on the subject. Living without diabetes is by Professor Roy Taylor, one of the key researchers who demonstrated that Tpe 2 diabetes could be reversed. Busting the diabetes myth is by Dr. David Cavan, my current diabetician, who is highly exercised by the past misconceptions about diabetes (including those I’ve listed above). Outlive, by Dr. Peter Attia, is a broader book which discusses the major illnesses that people can expect as they get older – of which diabetes is only one – and recommends lifestyle changes to give one the greatest chance of preventing them.
While the three books differ in their main focus, they are similar in several aspects. Firstly, their primary genre is that of the self-help book: they are expecting the reader to read the book and follow at least some of the steps that they recommend. They are filled with standard self-help tropes like giving you checklists for setting your goals. Secondly, all three authors are extremely keen to tell their personal experiences and histories: the patients they’ve treated, the research they’ve taken part in, how they developed their present views of how things should be done. That aspect is a substantial part of all three books and it’s one that I find only tangentially interesting: it serves to tell me why my past medical advice has been so wrong, but that’s about it. I’m not particularly interested in the success that the authors have or haven’t had with patients who are often very dissimilar to me, or in the stories those patients tell about their experiences.
In all three books, the explanations of what is actually happening in your body are woefully incomplete. Roy Taylor is the strongest here, with some chapters that explain clearly enough how type 2 diabetes progresses (fat deposits in the liver cause insulin resistance, followed by which fat deposits in the pancreas compromise your ability to produce insulin in the first place). Peter Attia has huge amounts of interesting information to impart on a broad range of topics, but he and his co-author Bill Gifford do little to help the reader tie this information into an overall framework of knowledge, often making an offhand reference to some hormone or other and leaving it hanging in the air.
Which brings me to the book I want: something that explains to me, comprehensively and one at a time, each of the processes involved in my metabolism: how I get hungry, how I digest food, how that food is transformed and carried around my bloodstream into which organs, how it is consumed. With such a book, I truly believe that I would become better at “listening to what my body is telling me” and making better decisions – on an hour to hour basis – on the crucial items of what I eat, how I exercise, what drugs I take and when, how I cope with stress. I don’t want to make lifestyle choices based on epidemiology alone: it must surely be preferable to use myself as my own guinea pig than to simply accept the average of some cohort of my age, race and height.
Rather than a “self-help” book – which really means following a set of advice given by an author who has no knowledge of you in particular and can only generalise from their understanding of similar people – let’s call what I’m looking for a “self-knowledge” book, learning as much as possible about how the human body works to enable you to understand what’s happening under the surface when your body reacts in a particular way.
Of course, there are many books and papers written about metabolism for medical professionals. But these are utterly inaccessible to someone with my level of knowledge. The first result on a search for books about glycogen storage, for example, was Glycogen storage diseases with liver involvement: a literature review of GSD type 0, IV, VI, IX and XI. There’s a reason why doctors go through a decade of training.
So I’m imagining a book at the level of GCSE biology (for non-UK readers: these are the exams taken at age 16), in other words a book that it’s possible to understand as long as one understands biological basics like “what’s a protein” or “what’s a hormone”, but which doesn’t assume that you’re pursuing a medical career. I haven’t yet found anything at that level, although the exam authority AQA does have an optional syllabus section at A level (18-year olds) which deals with metabolism in some detail, so the set texts might have something comprehensible – it’s on my list to check.
Strangely, the nearest thing I found in my local library was “How the Body Works” from Dorling Kindersley, done in their usual picture-book style. Its intent is certainly in the right direction and it’s helpful up to a point, but the subject is just too complex for a guide which is 100% built around illustrations with no body copy whatsoever. I applaud DK for a noble effort which gives a lot of interesting information – but I need to go deeper on the particular subject of food and metabolism.
If anyone reading this hasopinions on this subject, I’d love to hear them, so please do leave a comment. Maybe the right book is out there and my limited web research hasn’t found it. Maybe the book I imagine is unfeasible: the processes are too complex to be explained, even on a superficial level, to someone who hasn’t mastered a substantial level of medical education. I could imagine that the our current medical knowledge might be too incomplete to be simplified in a way that would stand up to scrutiny without being riddled with caveats, or that our understanding is shifting so quickly at the moment that you can’t pin it down. Perhaps there are only a tiny number of people who would be interested.
Or maybe, just maybe, there’s a book waiting to be written.
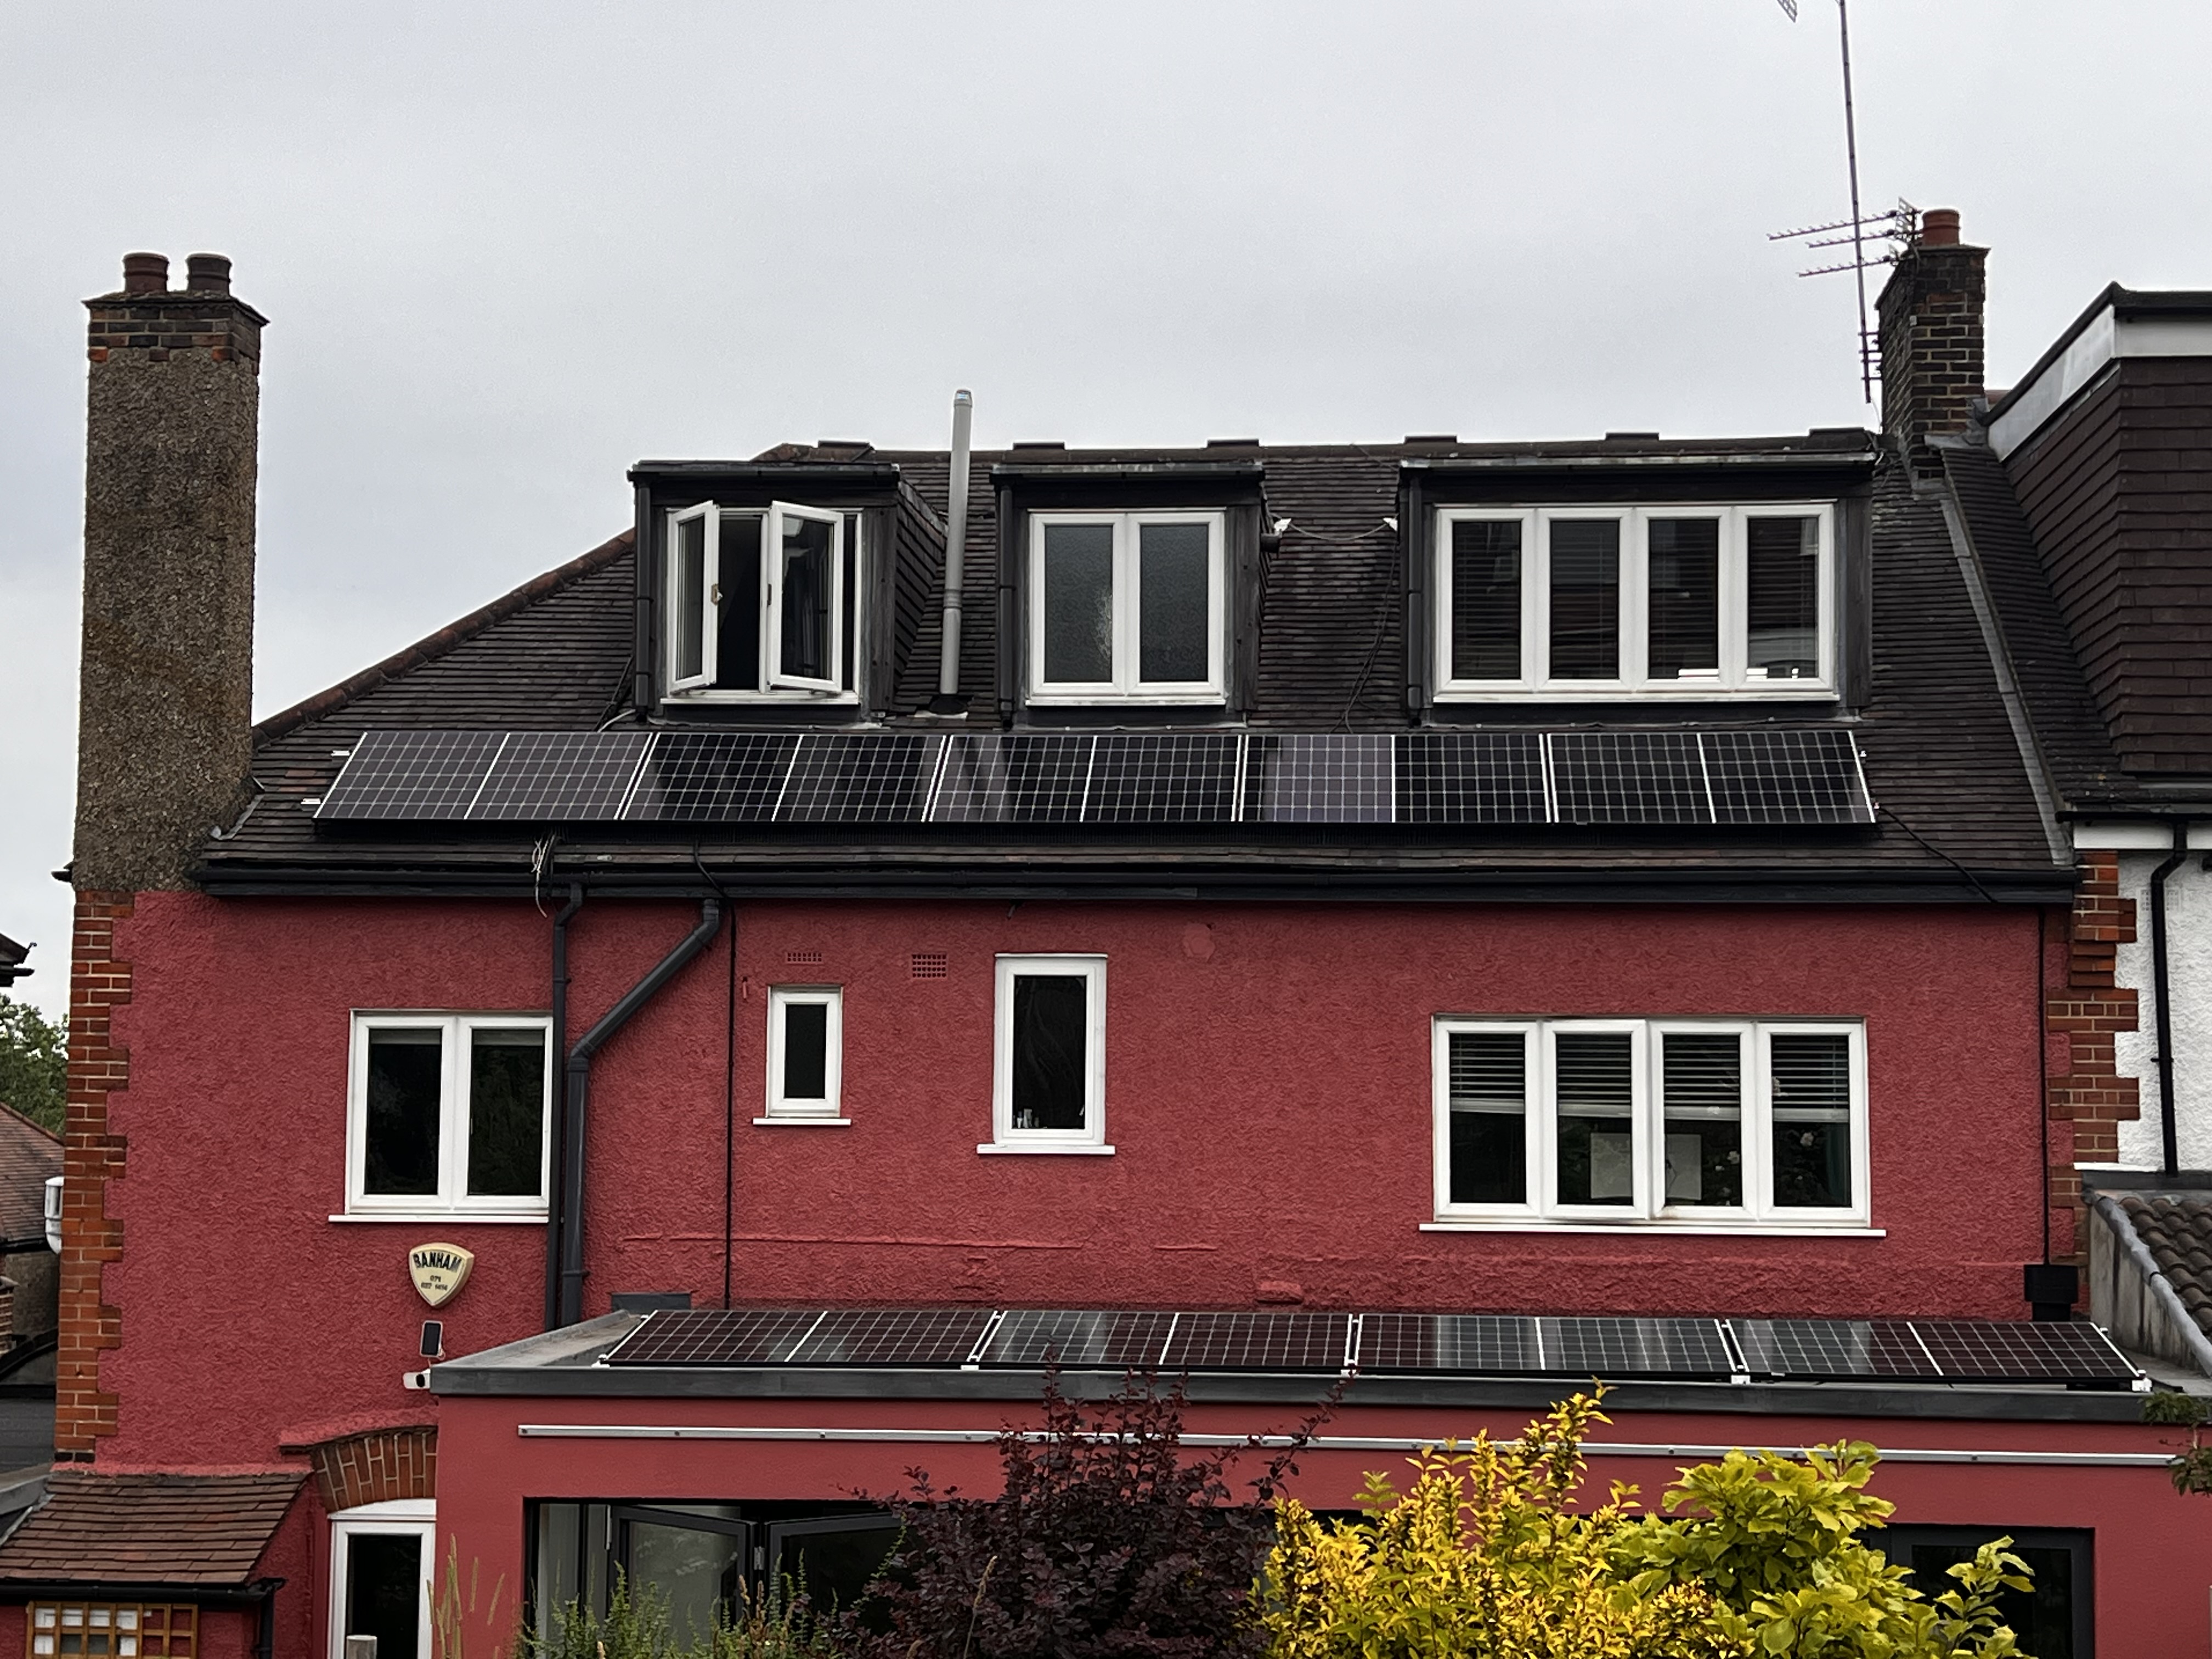
The climate crisis has made me steadily more interested in reducing my carbon footprint by putting solar panels on our roof. As well as being the green thing to do, the recent turmoil in energy prices has made it economically sensible, so I’ve taken the plunge: last month, a substantial system of photovoltaic (“PV”) panels was installed on our roof. Should you do the same?
When specifying a solar energy system, there are many possible choices of exactly what equipment to install. The decision-making is complex because there are a lot of variables: how much electricity you expect to use (which will vary according to the time of day and the season), how you think energy prices will change, interest rates, whether you’re going to charge an electric car at home… The list goes on.
Solar installers will give you all sorts of models to show your return on investment: these can be somewhat rosy-coloured and generally only tell part of the picture, so I thought it would be a good idea to talk you through what the various components do and why I made the decisions I did, in the hope that it might help with yours (or just pique your interest). Most of what follows will apply regardless of which country you live in, but a few points will be specific to the current regulations in the UK.
First, you need an approximate scale of what you’re trying to achieve. Electricity use is measured in kilowatt-hours (kWh): roughly speaking, 1 kWh will light a small room for a couple of days, boil an electric kettle ten times or run a load on a small dishwasher. An average detached house in the UK uses around 10 kWh per day, according to OVO energy. Your daily usage should be shown on your electricity bill: ours was 17 kWh. I’m not yet totally clear about why we’re so far above average, but I’ll be working on it.
The major components of the system are as follows:
The PV panels, which convert sunlight into DC (direct current) electricity
The battery, which stores electricity for later use
The inverter, which converts the DC into the AC (alterating current) electricity that your house will use and also controls how much electricity flows to and from the battery
All of these cost serious money, so it’s important to get their amounts and sizes right.
How many panels?
A typical rooftop might fit between 10 and 20 410W panels – I ended up with 19, giving a maximum rated power output of 7.79kW. At first sight, that sounds like massive overkill: a maximum rated output of over 90 kWh on an average day with 12 hours of sunlight, compared to the 17 kWh that I use. But that’s wrong, for a variety of reasons:
In winter, days get much shorter than 12 hours
If the weather’s cloudy, the panels will produce a lot less than their rated output
In my case, because my roof faces east-west, only half the panels (roughly speaking) are operating at any time: the east-facing panels in the morning and the west-facing ones in the afternoon
There are inefficiencies in the system anyway
So far, the best that my system has managed, on one of the longest and hottest days of the year, was just over 40kWh (which was actually pretty impressive). The predictions in my quote are that I will be generating 61% of my total electricity usage: we’ll see how that pans out over the course of the year.
How big a battery?
Of course, you could operate without a battery at all, selling any surplus electricity back to the grid immediately and never storing it. The trouble is, in the UK at least, many of the electricity providers have been paying a pretty inadequate rate (as low as £0.05). This does seem to be improving, though: my provider Octopus have a tariff where they will buy my surplus power at a fixed rate of £0.15 per kWh, compared to the £0.49 they have been charging me for supply (which, to be fair, is going down to £0.31 this month).
Particularly since we have no idea how any of these tariffs are going to change, it therefore makes sense to have a battery big enough to store your usual overnight consumption (if you haver a smart meter, you should be able to figure out what this is, or you can let your solar supplier guess based on your total consumption and national averages). My battery has a capacity of 9.6kWh, which means that I will be exporting electricity back to the grid at the height of summer or when we’re on holiday and the house is empty, but not at other times. The batteries are modular and we might add another module to increase capacity in future, if it looks sensible to do so.
The inverter
In practise, the inverter will be the model with which your installer is most familiar. The decision to be made will be its capacity for delivering power, which needs to be higher than the maximum amount your system will generate at any one time. In the UK, there is an important limit: if your inverter is at or below 6kW, your application to join the electricity network is granted automatically; above it and you could suffer delays. My inverter is exactly at 6kW: because of my East-West facing roof, we can be sure that my solar panels will never deliver more than that, by a safe margin.
With your inverter comes a suite of software for monitoring how your panels are performing, how much electricity they are delivering, how much you are using, how much is going to and from the battery. Staring at the control panel on my phone was pretty addictive for the first week or two: the novelty is beginning to wear off now and I’m more inclined to let the system get on with it. Of course, it would be possible to spend hours analysing data and tweaking the inverter setup to the nth degree, most notably the parameters about how much it decides to charge the battery. I haven’t bothered to learn the tricks for doing this.
If your house doesn’t have much unused space, you may struggle to find a suitable place to locate the inverter and batteries. They generate a fair amount of waste heat, so you have to leave quite a lot of space around them. The place you choose has to be well ventilated. They won’t like being in direct sunlight (because of the risk of overheating). And you need to be able to run DC cables from them to all the panels, and AC cables to your consumer unit (the place where your electricity is distributed to the building).
Weatherproofed inverters do exist, which you can install on an outside wall. They’re more expensive, and you still have to be sure to keep them out of the sun.
You also generally need to ensure that they have an Internet connection available (different inverters handle this in a variety of ways).
Other ways of using surplus electricity
If you live in a very sunny place with a large roof, you might end up with a lot of surplus electricity. Here are some of the things you might choose to do with it.
Charge an electric vehicle – just to give you an idea of scale, the battery in my Tesla is 75kWh, nearly eight times the size of the one in my house. A typical 100 mile recharge is around 30kWh. But you could be generating enough power to make a sizeable dent in that, and/or you may have pretty low mileage anyway. In this case, you can buy a special purpose diverter (the popular brand in the UK is called a Zappi), which figures out, reasonably intelligently, when it’s a good idea to pump surplus energy into your car rather than selling it back to the grid.
Use it to heat water. In many UK homes, your hot water is powered by gas or oil, which is a lot cheaper than electricity, but the tank has an electric immersion heater for use as a backup. In principle, you could send the surplus electricity to your immersion heater to reduce your boiler’s gas usage, effectively using your hot water tank as a form of energy storage (the Zappi has a friend called an Eddi which does this). Trouble is, you need the right hot water tank for this to work: most domestic systems run on a thermostat, so unless you’re running your bath at exactly the moment when your electricity generation is high, the Eddi won’t contribute much.
Use it to power a heat pump. Air-sourced and ground-sourced heat pumps aren’t all that popular in the UK yet, because of a variety of difficulties. But the technology is improving, gas prices might get another upwards shock, and regulations discouraging gas usage could come in. As a result, heat pumps may become the way to go for more houses. If that’s the case for you, a considerably larger solar setup may be desirable.
The economics
If we’re honest, the economic case is a bit marginal, even with the recent turmoil in energy prices. My system cost over £20,000 and my installer’s fancy proposal-creating software gave a payback time of around 10 years, but that needed to be taken with a serious pinch of salt given that it all relies on assumptions about what was going to happen to electricity prices and interest rates (obviously, it matters whether you’re financing the project by borrowing or whether you have the money and it’s simply reducing your investment income).
So the chances are that you’re not planning to install solar for the economic benefit alone: you’re doing it at least in part because reducing your carbon footprint is a good thing in itself, or possibly because you live somewhere which gets a lot of power cuts, so having a high capacity battery gives you much wanted immunity to these.
Finding an installer
Even before the Ukraine war, the increasing desire to go green, together with the steady improvement in PV system performance, meant that there weren’t enough installers to meet demand. The energy price shock brought on by the war made the situation worse. So in the UK at least, good quality installers can pick and choose which jobs they do – which means that they’ll choose the ones they can do with least effort, ones close to where they’re based which don’t suffer from obvious technical difficulty.
Don’t be surprised if you contact an installer, get a first off quote which has taken them 10 mimutes with a bit of software, and if you then never hear from them again. I’ve had that happen twice, with a third attempt where an installer based somewhat far away decided that my job was all a bit too much effort and declined to continue. What finally worked for me was to identify a company who had done a successful installation at another house in my road.
Finally, once your system is installed and you get the right certificates to allow you to connect to the grid, you’ll want to choose the best possible tariff and get your installer’s help to programme the inverter to make use of it (for example, Octopus Energy tell me that for them, you want to avoid taking grid electricity between 4pm and 7pm). But that’s a whole other story…
So should you invest in PV?
Every situation is different: your economic forecasts and financial situation will be different from mine, as will your expected energy usage, the orientation of your roof, the ease or difficulty of access to it, the value you place on reducing your carbon footprint and many other things. And of course, there important things we don’t know: how energy prices will change, and how the technologies involved will change (hopefully to improve, but maybe to become more expensive if there are materials shortages).
Anyway, I’ve done my best to give you enough background to properly critique your supplier’s proposal and estimates and come to an informed decision. Good luck with your solar power journey!
Sachertorte is my favourite chocolate cake, but since it’s based on flour, you can’t serve it at Passover. You can, however, serve this flourless chocolate almond cake, whose recipe was passed down to us by my late mother-in-law and is a firm family favourite (Joan was much loved, by the way – very much the opposite of the Les Dawson stereotype).
3 eggs
100g dark chocolate (as usual, my favourite is 70% Chocolat Menier)
100g sugar
100g ground almonds
100g butter, plus some for greasing
15ml (1tbsp) brandy or rum, optional
A small cup of espresso coffee (I made 60ml or so). An alternative would be a teaspoon of instant coffee dissolved in 30ml or so of water
Preheat oven to 135℃ fan
Line the base of a 23cm (or so) cake tin with baking paper, grease the sides with butter
Melt the chocolate in a double boiler. If the butter is hard, chop it into small pieces.
Add the butter and mix until melted
Reserve 25g of the sugar in a small bowl
Add the remaining 75g of sugar, ground almonds, coffee and brandy to the chocolate mixture and stir until smooth
Remove the top of the double boiler from the heat. If you’re feeling impatient, cool it in an ice bath. Otherwise, just wait for it to be not too much above room temperature: you don’t want it scrambling the egg yolks.
Separate the eggs into two bowls
Whisk the whites until soft, add the 25g of sugar, and whisk until you have a stiff meringue
Whisk the yolks until foamy, then add the chocolate mixture and stir
Fold in the meringue until you’ve got rid of any blobs of egg white and any swirls of dark chocolate.
Pour into your cake tin and bake. Everyone’s oven is different: I gave the cake around 40 minutes, opened to check it with a skewer, and then gave it another 10 when the skewer didn’t come out quite dry.
Cool on a rack for as long as you can bear it.
Serve (with whipped cream, if you’re feeling Viennese).
I’m going to find it difficult to explain Wakatobi to you. If you’re not (yet) a scuba diver, I’m going to attempt to describe the whole experience of coral sea diving in a few hundred words. If you are already a scuba diver, you’ll understand the general attraction, but Wakatobi is almost certainly a different experience from anywhere that you’ve dived previously (unless, I’m reliably informed, you’ve been to Rajah Ampat).
Overwhelmingly, people like me who love warm water diving in coral seas do it for one big reason: we love gazing at the wildlife (there are other sorts of diver, like the ones who dive deep into ice cold water to hunt for artifacts in wrecks, which is a different experience altogether). So when we talk about our dives, we discuss excitedly whether we saw a turtle or a shark or a manta ray, or a tiny brightly coloured mandarin fish found only in this particular corner of ocean, or of a coral shrimp so tiny and translucent that it took the sharpest of eyes to notice it. Many divers are obsessive about writing up every dive in their logbook, not least because the major certification bodies make this an important part of one’s training, and old habits die hard. On a good dive in normal sites, which would typically last somewhere between 30 and 60 minutes, you might expect to see a dozen or so notable things (the definition of “notable” is fuzzy, but everyone agrees that it includes sharks, rays and turtles, and it usually includes any bright, colourful or physically odd-shaped fish that isn’t present in massive numbers in the area you’re diving).
The thing about Wakatobi is that on just about every dive, you reach the “dozen notable things” mark in about the first five minutes. Then, the number keeps clocking up as you go, accelerating as you reach the shallows, especially if the sun is out. If you try to remember all the species you’ve seen on a dive, you’re on a hiding to nothing; even counting them is beyond my ability. I’ve tried remembering all the species of butterfly fish – just one small section of the marine diversity out there – and given up when it gets to a dozen (it turns out that around 60 of the world’s 120 species are present in the area). In other dive areas, you might struggle to think of any really significant thing you saw during a dive. At Wakatobi, you have the opposite problem: you’re getting sensory overload. It’s best to start a dive with a couple of things you’re going to look out for, like, for example, counting butterfly fish species, counting turtle sightings (my maximum count was twelve) or searching the sand for its inhabitants. The goby-shrimp combo is a particularly cool sand-dwelling symbiosis: the shrimp lives in a hole and does the housekeeping, ejecting anything it considers not to be nice and clean, while the goby (a silvery fish around 3cm long) stands on guard outside.
If you compare coral reef diving to wildlife-watching on land, the difference in sheer profusion and diversity is simply enormous. Whether it’s a safari in Africa, hoping to see the “big five” (elephant, lion, leopard, rhino, buffalo), looking for bears or moose in Scandinavia, or just bird-watching in the UK, you can spend most of your hours in the field waiting for some animal to put in an appearance. On a coral reef, by contrast, there is a riot of colour and shape all around you.
It’s not just about the fish. The coral comes in a thousand forms. The hard corals are generally named after things on land: potato coral, lettuce coral, mushroom coral, plate coral, brain coral (you get the idea). They can make very large formations indeed. Some sea fans can be well over the size of a person. Roma, one of Wakatobi’s dive sites, has two enormous “coral roses” of overlapping plates which must measure at least 30m in diameter. Towards the top of the reef, you can see single formations of staghorn coral that last for 100m at a time, hosting an unbelievable variety of reef fish sheltering in its branches. The soft corals can be equally eye-catching, like watching a colony of Xenia coral feeding, each of its dozens of arms waving in the swell, with a star of eight feathery “fingers” opening and closing to grab nutrients which pass by. Blown up in your mind’s eye, it’s the stuff of horror movies. There are many other creatures that are not corals. Ali Baba could hide inside the basket sponges without a problem; Lampert’s sea cucumbers form scary white patterns around the outside. There’s the tunicate family: solitary tunicates with a delicately veined pattern like fine porcelain, bluebell tunicates, electric blue translucent ovals which you’ll see in colonies scattered across the reef. Sailor’s eyeballs are a type of anemone which look for all the world like giant pearls.
Everyone has their own favourites. I love the ambush predators, like the crocodile fish which looks extremely like its landbound namesake, except that it’s perfectly camouflaged for the underwater landscape. We’ve seen a scorpion fish coloured white as it swims through the water, then settling on a reddish brown rock and then changing in an instant to match the place where it has settled, waiting for prey to arrive. There’s also defensive camouflage: at 20-30cm, a trumpet fish isn’t exactly a small item, but it’s surprisingly difficult to spot one when it’s pretending to be one of a bunch of sea rods. Many divers and most dive guides seem to love nudibranchs; personally, I struggle to see what the fuss is about. At the end of the day, even if it’s brilliantly coloured and boldly patterned, a snail is a snail. But big shoals are always a thrill, particularly when they’re tiny fish swirling around in a “bait ball”, whose shape morphs as they move with the current’s ebb and flow or perform some shift to attempt to confuse predators. I also love seeing parrot fish bump the coral, bite off a chunk and grind it up into fine sand which you can see them excrete (after they’ve ingested the nutrients). It’s not far off the mark to assert that the fabulous beaches of white sands in these parts are largely composed of parrot fish droppings.
By the way, I haven’t attached any underwater photos because I stopped taking them a few years ago: I realised that I wasn’t enjoying dives any more because I was spending all my time worrying about the camera and the pictures. There are plenty of people who disagree with me, as a search for “Wakatobi underwater” will quickly show you.
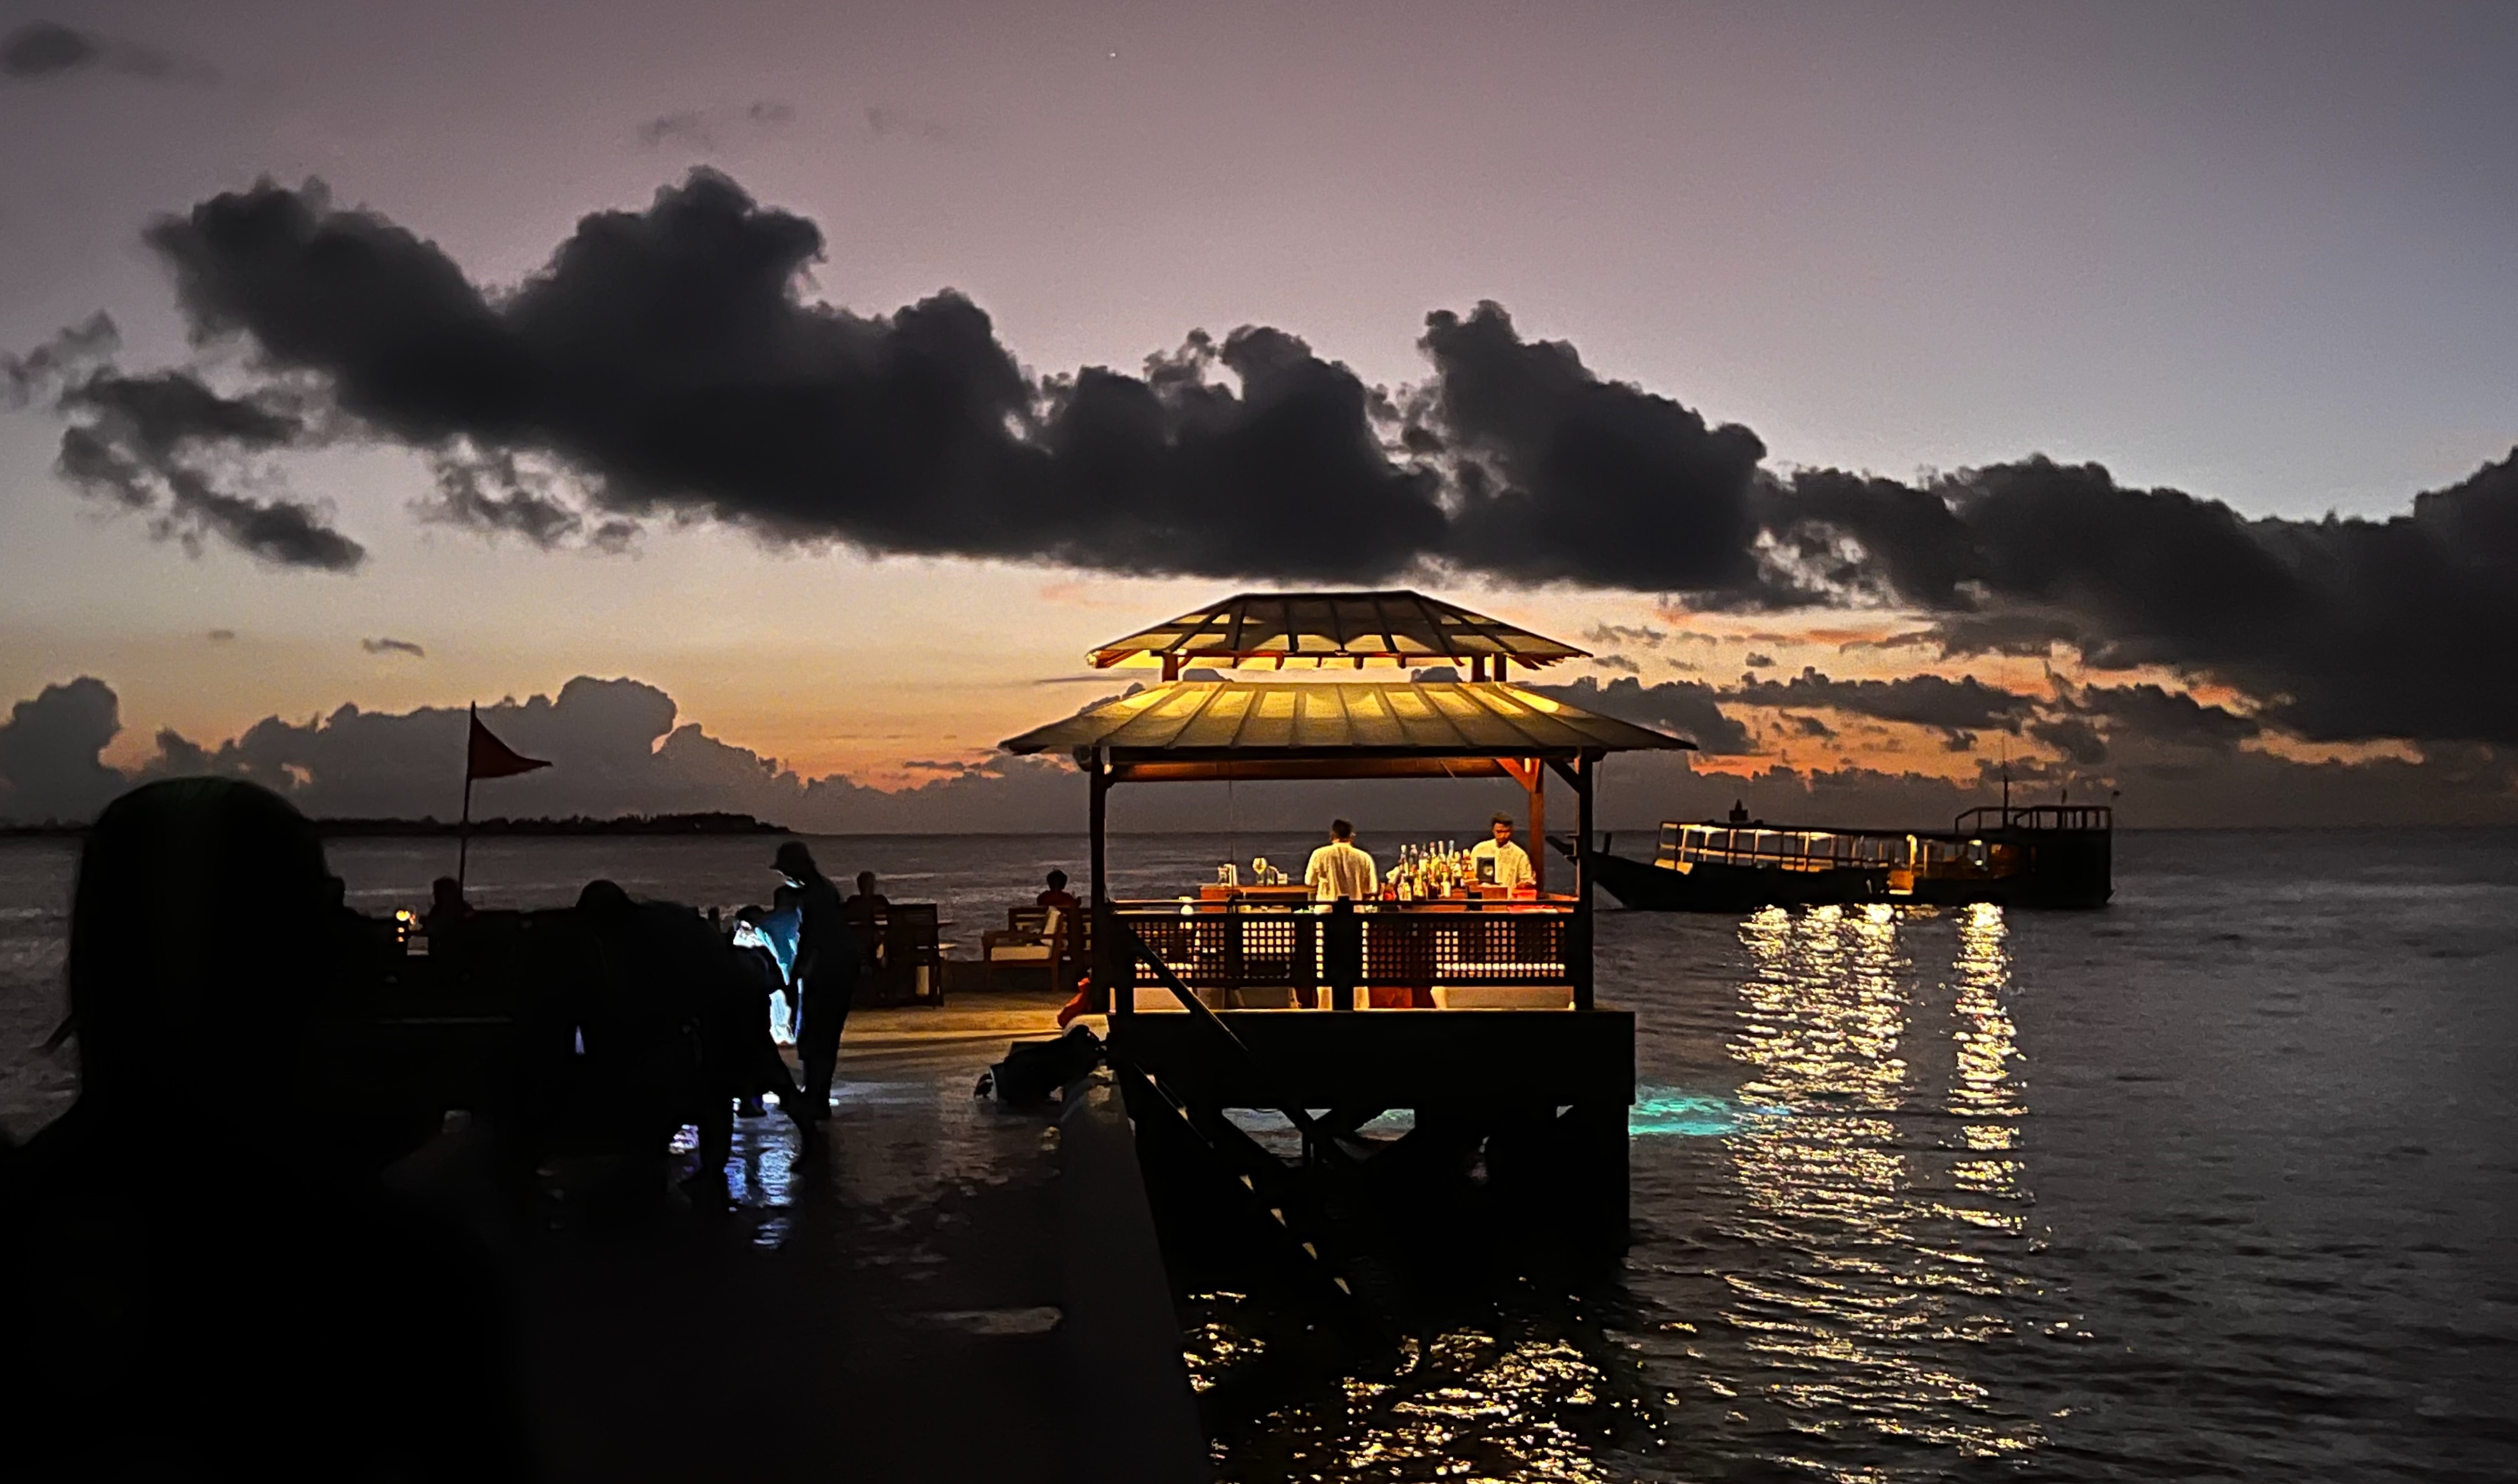
Wakatobi is located just off the south-east corner of Sulawesi (that’s the spindly one on the Indonesian map) in the so-called “coral triangle”, which brings me to the first of my three caveats: it’s a bitch to get to. If you’re coming from the UK or the US, you have to spend the best part of a couple of days getting to Bali, and it’s then a two and a half hour charter flight to the airstrip on nearby Tomia island. They do their best to make the trip smooth and efficient, but any way you look at it, Wakatobi is in the middle of nowhere.
Second caveat: you won’t see much in the way of large pelagics here (sharks, rays, etc). And finally, Wakatobi isn’t a cheap ticket by any stretch of the imagination. It’s a luxury resort with a capacity of around 60 guests, where they take exquisite care of you. You do pay for what you get, although not at the level of the ritzy international brands.
Somehow, when you leave, the team there manage to make you feel like you’ve just left a long lost second family. I don’t know quite how they do it, but whatever the magic is, it results in a lot of return guests. We’ve just done our third trip and it won’t be the last.